

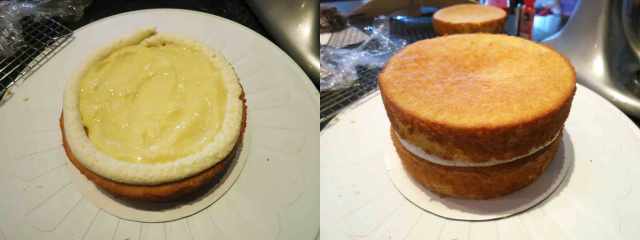
For my last project for the ninja baby shower I made a cake. The mother-to-be had requested bright, punchy flavors, so I went with a lemon cake using my hot milk sponge cake as a base, filled with a fantastically easy homemade lemon curd (recipe below, and it’s the creamiest, most luscious lemon curd ever) and iced with my favorite cooked-flour frosting. Then it was time to decorate!
I knew I wanted something special to tie in to the ninja theme, but just piping little ninjas or sticking the ninja cookies to the outside of the cake seemed boring, so I went in a little more sophisticated direction. I printed out some reference images of Japanese temples, and sketched them (interspersed with trees and a bridge) onto long, skinny pieces of parchment paper. I flipped the paper over (didn’t want graphite in my cake), and carefully traced out the design with melted dark chocolate in a squeeze bottle (a little less precise than I’d have hoped, but not bad). Then came the tricky part…
In order to wrap the piped design around the iced cake, the chocolate needs to be firm enough not to smear, but soft enough to bend without cracking. It’s a fine line to walk, and since I don’t temper my chocolate (it sets more slowly if it’s untempered) I generally set the chocolate designs in the refrigerator for a few minutes to firm up a bit. If I can touch them and have just a tiny bit of chocolate come off on my finger, they’re ready. The iced cake should be cold, too (but not frozen).
I carefully wrapped the piped chocolate, still on its parchment paper, around the cake, joining up the seams as well as I could. Then I put the whole thing, parchment and all, back into the refrigerator to set completely. I didn’t peel the paper off until the last minute before serving.

Adding a few ninja lollipops for accents, the cake looked amazing and tasted just as good.

Here’s the recipe for lemon curd… I use a whole-egg recipe rather than a yolks-only one because I prefer the lighter mouthfeel that the addition of egg white gives. I can’t get over how easy it is to make this– the hardest part is zesting and juicing the lemons (remember, if you scrape your knuckles on the zester, subsequent juicing will make them sting like mad), and the rest is done at the push of a button! If you prefer, you can dispense with the food processor and just whisk it all by hand, but I find that the processor makes for a smoother curd.
Microwave Lemon Curd (adapted from King Arthur Flour)
Makes just under 2 cups
- 1 cup freshly squeezed lemon juice (I used 3 large lemons)
- Zest from the lemons
- 1 cup sugar
- 1/2 cup butter, melted but not hot
- 2 large eggs, room temperature

1) Process lemon zest and sugar together in a food processor until finely ground.
2) Add the eggs to the food processor and process until smooth. You’re looking to break up all of the egg white so it doesn’t coagulate later.
3) Slowly add the butter to the egg/sugar mixture and continue to process until smooth.
4) Add the lemon juice and process until combined.

5) Pour mixture into a large microwave-safe bowl. To avoid bubble-overs, the contents should fill no more than 1/4 of the bowl, it should have at least an 8 cup capacity. Put the bowl on a plate to catch any spills.
6) Microwave the ingredients at 100% power in 1-minute increments, stirring well to combine after each minute.
7) When curd starts to thicken and coats the back of a spoon, it’s done. This will take anywhere from 4 to 10 minutes, depending on the strength/power of your microwave. The curd’s temperature should have reached at least 185°F. Don’t go too much over that or it’ll curdle! (not good, despite the fact that this is “curd”)

8) Stir the curd one more time, spoon it into a storage container, and refrigerate, covered, until firm. It’ll set more like pudding than like gelatin– thick enough to spread, but not really thick enough to hold much of a shape.
9) Keep curd refrigerated for up to 3 weeks; freeze for longer storage.
Notes:
- When piping the chocolate design I made sure to keep the edges nice and thick. Not only so they’d be less likely to snap off, but also so they’d have more mass and would be less prone to melting. Sadly, this did result in less detail than I’d have liked in the design, but I think it was a good trade-off.
- When assembling the cake I piped a thin line of frosting around the edges of the cake layers, surrounding the lemon curd. That’s to make sure the lemon curd didn’t ooze out the edges, since it was looser in consistency than the frosting was.
- This cake was baked in three 7″ layers, rather than 9″ layers like the Anne of Green Gables cake. I wanted the extra height to give the chocolate design more room for drama. I probably should get a set of 8″ pans one of these days, but I have enough pans right now as it is…
- Finally, this lemon curd really is amazingly delicious. I had some left over from the cake and tried to think of something else to use it in– tartlets, biscuits, cookies– but ended up not being able to wait and just eating it with a spoon. I regret nothing, but I’m already imagining using it to make lemon tarts with blueberries next summer…


I love the decorations on your cake! It’s beautiful! And I cannot believe that curd recipe, I’ve been slaving away at the stove like a fool 😝
LikeLiked by 1 person
The chocolate piping work is absolutely incredible!!
LikeLiked by 1 person
Your chocolate decoration is amazing
LikeLike
don’t know what I am more impressed by – the fab choc decorations, or the fact you can make lemon curd in the micro. Fab post.
LikeLike
Cake was super tasty, and visually impressive. Thanks!
LikeLike
Looks Delish!
LikeLike
Pingback: Microwaved Chocolate Pastry Cream | It's All Frosting...
Pingback: Lemon-Blueberry Tart | It's All Frosting...
Pingback: Pavlova with Lemon Curd and Berries | It's All Frosting...