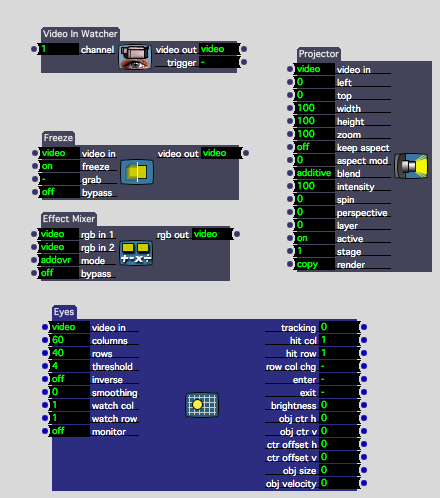
This is more of a tutorial if anything. By the end of this post you will be able to (hopefully) create a basic motion tracking patch using Isadora. I am using Isadora (version 1.2.9.22) on a Mac.
1) Open up Isadora
2) Find and select the ‘video in watcher’ actor.
3) Open the Live Capture Settings from the Input Menu.

4) Click Scan for devices, then select the video source from the drop down list. I am going to use the built in iSight camera, you may use anything. Then click Start.

You should see a small preview at the bottom of this pop up window. Make sure you press start!
5) Go back to the first window and then find these actors:
Freeze
Effects Mixer
Eyes
You should have something like this on your screen:

6) By clicking on the small dots (from left to right) connect the actors so that they appear as follows:
(note the projector is not currently being used)
7) In the effects mixer, change the mode to ‘Diff’, abbreviated to ‘Difference’

IMPORTANT: Notice how we are using two feeds from the video in watcher, one going to the Freeze actor and the other into the Effects Mixer Actor. This is so we can freeze a still picture, then compare it (or look at the ‘difference’) between it and the live feed. This gives us our data for motion tracking. We take the still image by clicking the ‘Grab’ on the Freeze actor:
MAKE SURE NOTHING, OR NO-ONE IS IN THE SHOT/FRAME WHEN CLICKING GRAB!
If not this will conflict with the data. This is the most common thing to go wrong!
8 ) Switch on the monitor for the Eyes actor by clicking and changing this button:

You should now see some black and white images with Red and Yellow boxes and lines.
The red lines correspond to X-Y, the horizontal and vertical points of the tracked image.
The yellow box outlines the biggest object in the shot, also giving out data in relation to the top left hand corner of the box.
9) It may help, just for experimenting, to join up the projector so you can see the live feed on screen, if not please skip this bit. Otherwise it should now look like this:

Go to Output and Show Stages to see this stage/output.

10) A few tips:
Turn on smoothing in the Eyes actor to smooth out values.
You can use the threshold in the Eyes actor to ignore/bypass and unwanted light/small objects in the frame.
You can inverse/invert the incoming video into Eyes if you are wanting to track darker objects, or sometimes it can just work better depending on the lighting and space.
Sometimes using a Gaussian Blur in between the output of the effects mixer and eyes can smooth out the video and make tracking a little easier.
11) Now play… there are endless possabilaties as to what you can do with this X+Y data, for this use these outputs:

If you have any questions, please contact me via this website of via the Isadora forum found here: You will find me under the alias of Skulpture.
Hope this helps, Enjoy Isadora and let me and the Isadora community know how you are getting along.


muchas gracias, me gusta Isadora, pero soy muy torpe.
greetings from argentina.
Thanks Michel
Pingback: Motion Tracking « Jiajing's CreAtive ProJecTs
Thanks for this, very helpful – I wouldn’t of thought of the ‘freeze’ trick
No problem Bob, glad it was helpful.
Pingback: 2010 in review « VJ Skulpture's Blog
Pingback: The problems with motion tracking « VJ Skulpture's Blog
Hi 😉
thanks for sharing. I tried your method and it works great.
One question.. when the scene changes, “grab” is reset and if the dancer does not leave the scene is recorded as the reference image. ¿I can activate a grab at the beginning and keep the same image in different scenes?
thanks!
Hi.
Yes a grab is taken every time you enter a new scene. You can use a broadcast actor to send a trigger to all the ‘grab’s’ in all the scenes – however i’ve not actually tried this I must admit. Obviously you can re-triger the grab but I know that this is not always possible. There are one or two other things I think may work but I would have to try them out first.
Hope this helps for now. Let me know how it goes.
Hi again,
I could not fix the problem of the trigger. Can you explain any alternatives? Perhaps another method to capture the image?
Thanks;)
You could take a still picture using a normal digital camera I guess -but it’s not ideal. Then instead of the freeze actor replace it with a picture player. I need to try this out.
There is also a way to activate a scene and have it running in the background but I need to try this out too. Let me have a look at it this weekend and see what I can do. 🙂
Hello Graham,
I’m using this software for a University module. Do you mind explaining how the actors would work in this particular patch so I can put it in my portfolio?
Thanks,
Henry Phillips
Hi Henry. I don’t know how else I can explain it really. The method is called background subtraction but I can’t tell you exactly how it works on a programming level. The pinnacle aspect is the ‘difference’ between the live feed and the background image (the freeze) this goes into Eyes and Eyes creates the numbers/data. Hope this helps.
Pingback: Inputs A e V | contradicções
Pingback: Motion Tracking Tutorial in Isadora | Black High Castle
Pingback: visão computacional – .