Send Some Sunshine! 3 Spring Mail Art Tutorials
Well, it’s day whatever of the quarantine, and I don’t know about you, but Netflix and crossword puzzles are getting a little old. And even though we can be in constant contact with our friends and family thanks to technology, we’re missing out on some of the feeling that comes with being together. And as awesome as technology is, it’s not necessarily something you can hold and touch. I mean, I guess you could lovingly caress for laptop, but let’s save that for day 100 of the quarantine.
All that intro is to say I think it’s high time we start sending more letters. While sending a physical, tangible letter may not be as good as being there in person, it’s a hell of a lot more personal than a text or DM. And let’s be honest: we all need a little pick-me-up these days. And there’s nothing like sorting through bills and political mailers to find a handwritten letter.
But you know me. It’s not enough to send mail — it’s gotta be EXTRA. So today, I’m going to show you tutorials for 3 different spring-inspired pieces of envelope art sure to elicit excited squeals and maybe even a happy tear or two.
And because I don’t want you going out for supplies (seriously, STAY HOME), today I’m using materials most of you will already have at home: envelopes, stamps (can’t be choosey about color here — what you got is what you got), a black pen, washi tape (I know you crafty folks have this on hand) and Crayola markers. Yup, that’s right — we’re going elementary school with this ish and I am here.for.it. Let’s begin, shall we?
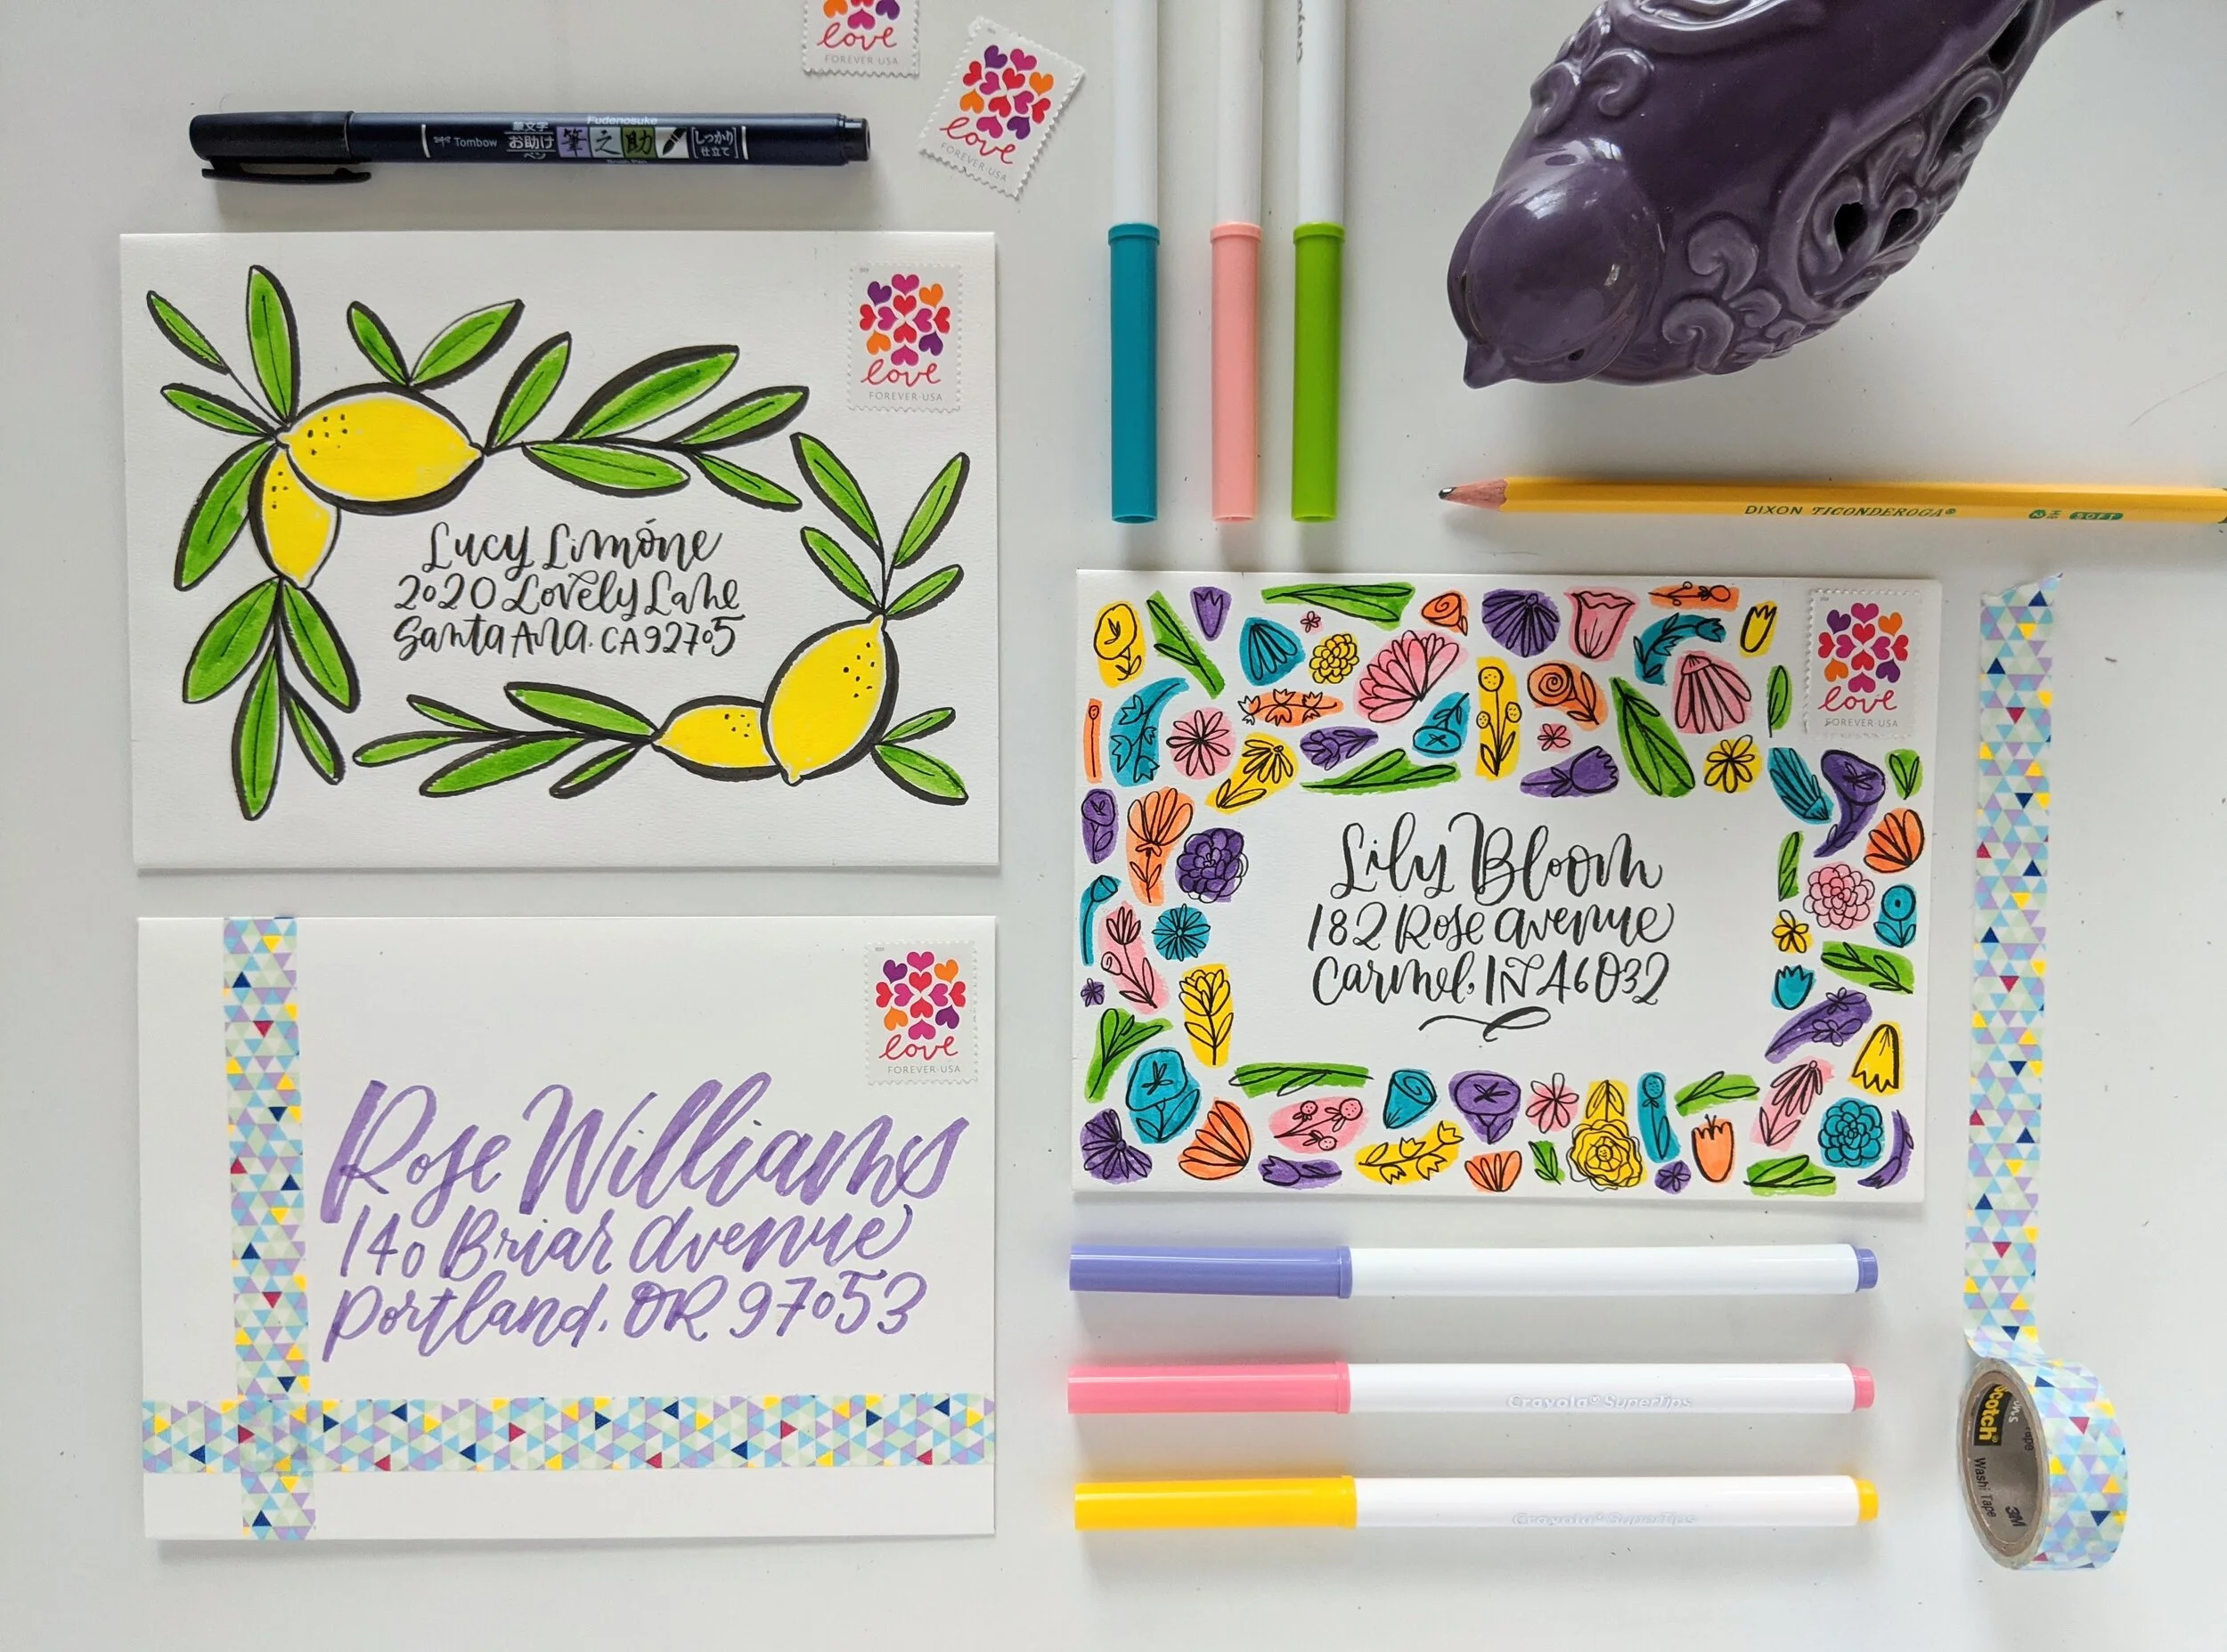
WASHI TAPE “PACKAGE” ENVELOPE
For this first tutorial, you’re gonna need:
Washi tape
Marker in a coordinating color
Don’t have any washi tape? No problem - skip on ahead to the next tutorial. Again, no need to risk COVID-19 to get decorative tape. I rummaged through my collection and found this pastel triangle design that, believe it or not, was made by Scotch tape. (I know, right?!)
We want this letter to look like a little gift in the mailbox, so we’re going to wrap it around our envelope like a package. First, place a piece of tape parallel to the left edge, leaving an extra 2 inches or so at the top of the envelope — make sure you leave enough room to the right of this piece of tape for your address.

Don’t cut the tape off that the edge of your envelope! Instead, wrap it al the way around, and tuck the end into the envelope. Then take the extra length at the top and wrap it over the flap. Instead of tucking the end under the flap, cut it off — we don’t want to interfere with the glue. If you’ve done it correctly, both these ends should more or less line up. If they are way off, just peel off and reposition — that’s the beauty of washi tape!

Next, we’re going to add the second piece of “ribbon” around our package. Add another piece of washi tape parallel to the bottom of your envelope and perpendicular to your first piece. This overlap will give it the pretty packaged look we’re going for. Wrap all the way around, just as you did with the first one.
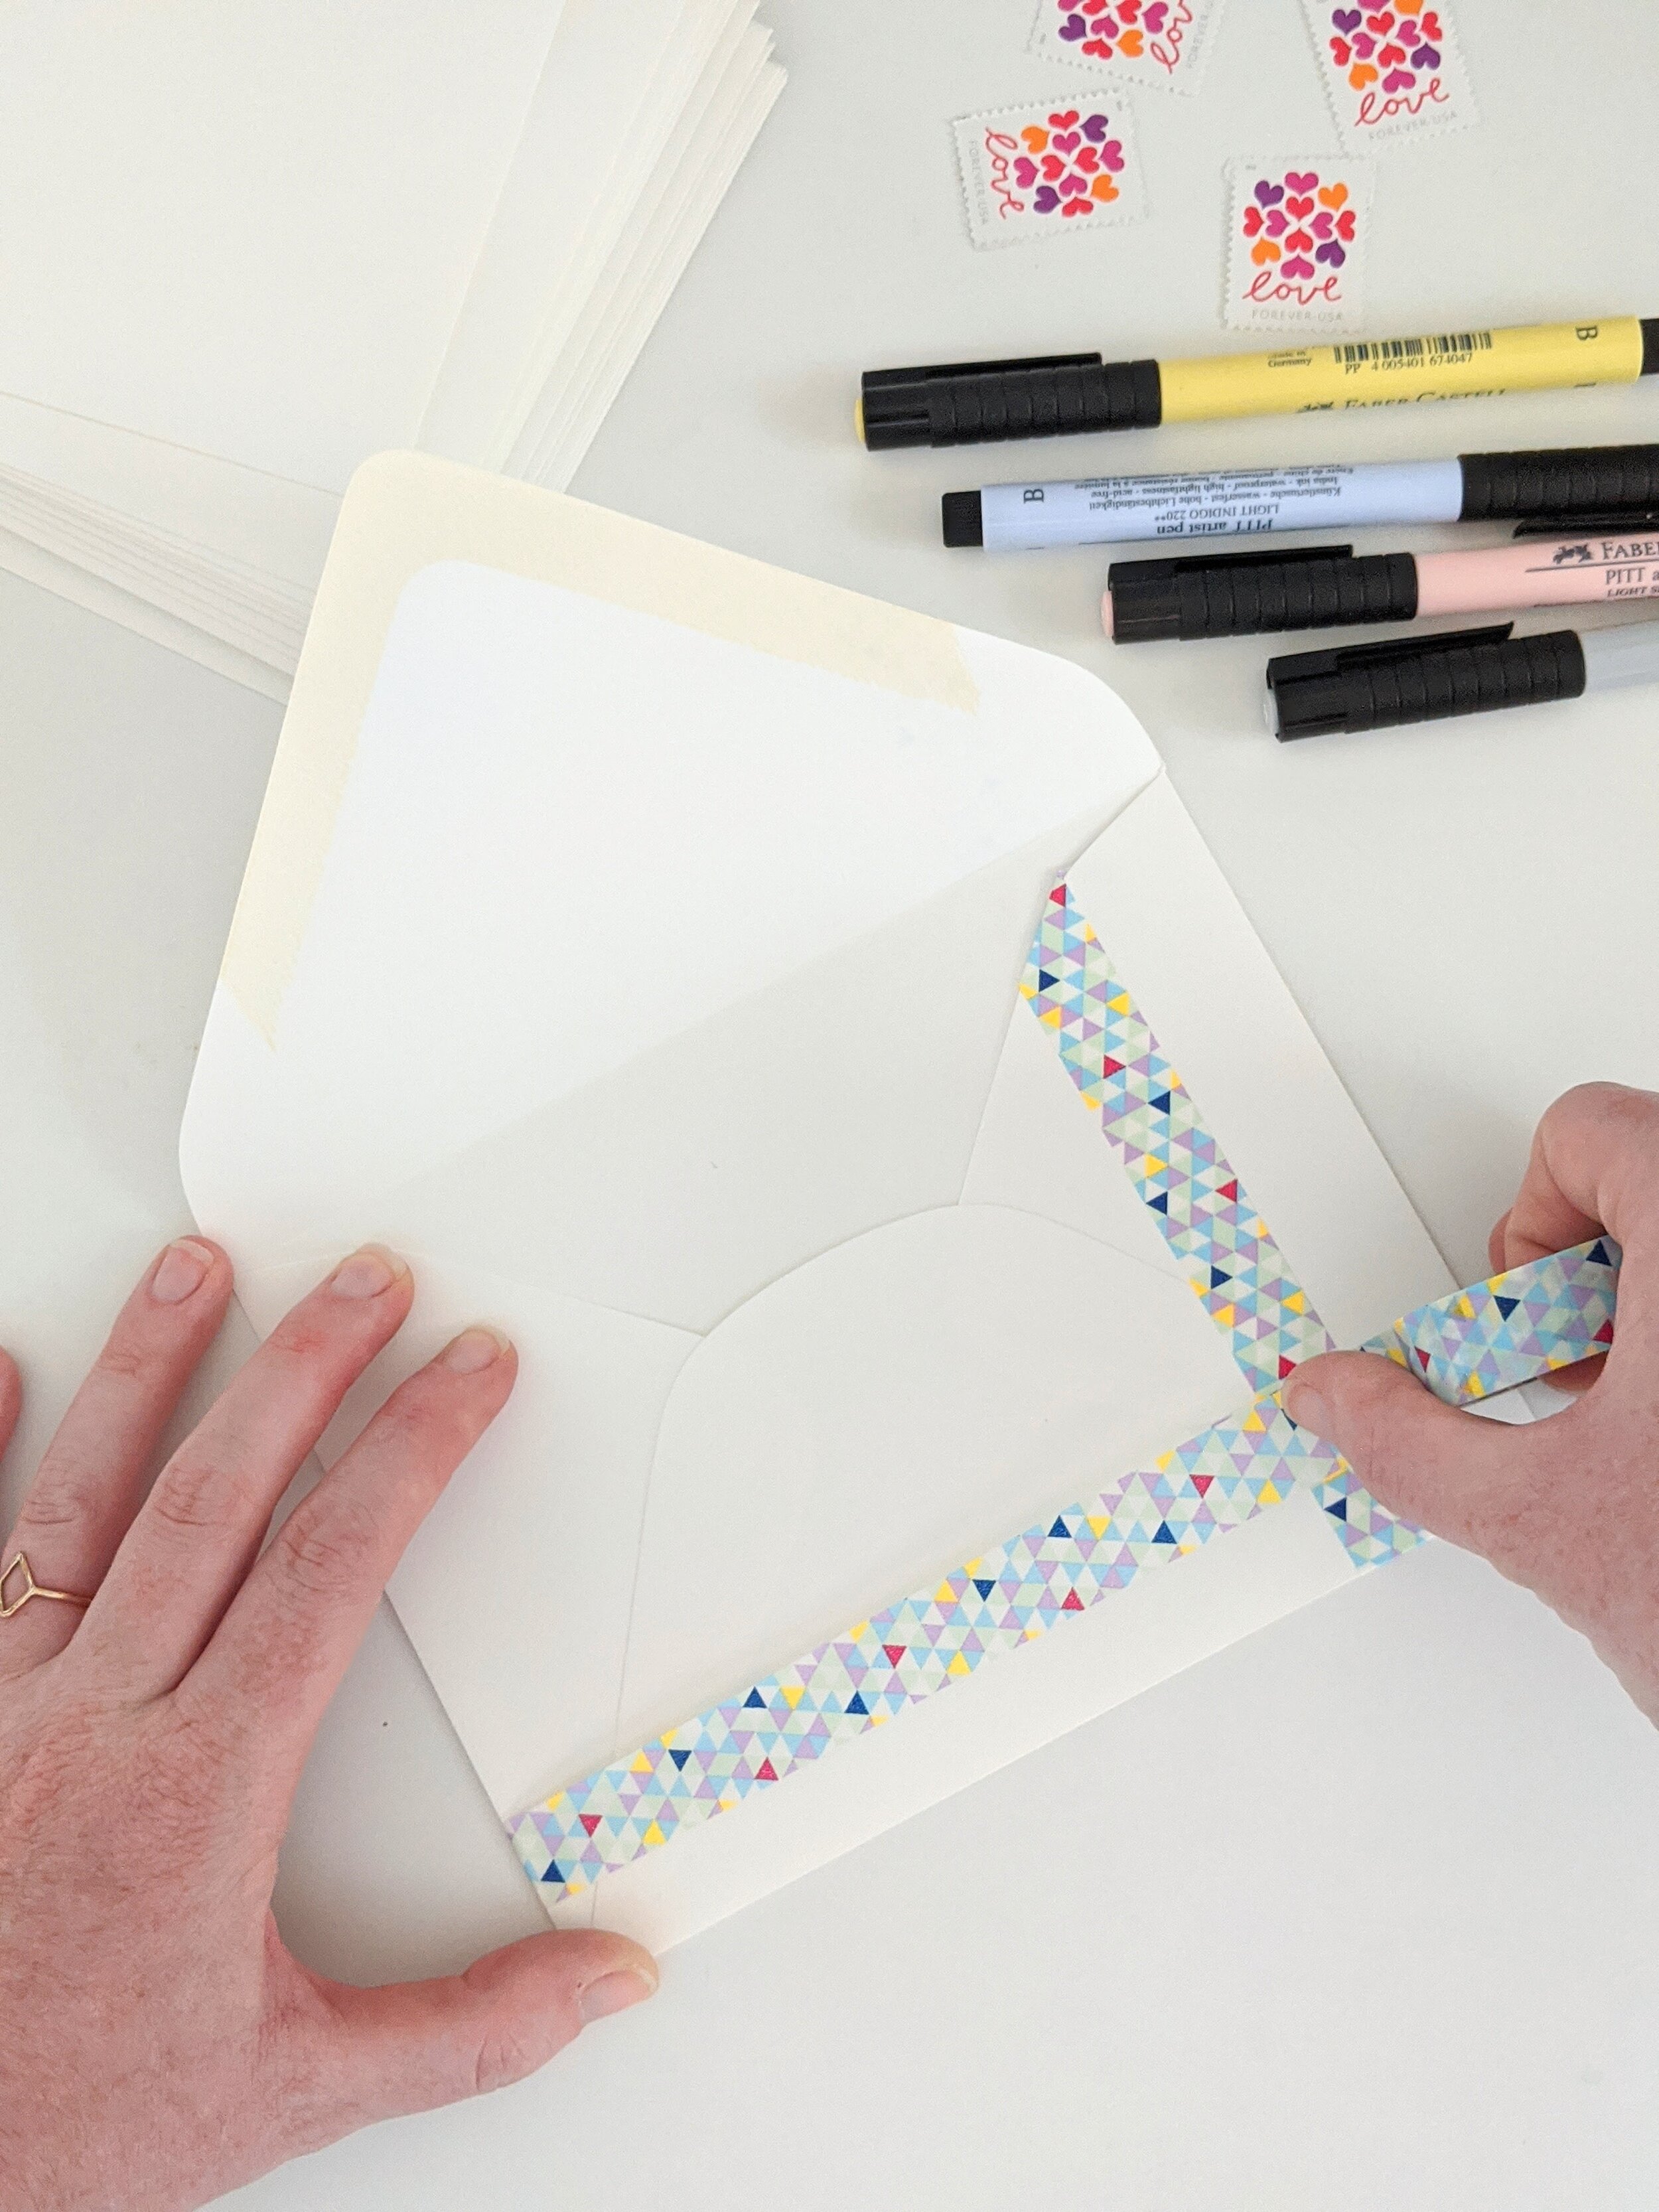
Now it’s time to script! Grab your stash of Crayola markers and see if you can find one that matches a color in your tape. I tried a few different ones, and this lavender Crayola SuperTips marker worked PERFECTLY. Script your address, and you’re ready to send! (NOTE: For this and the other tutorials, you’re going to script the return address on the back flap — don’t forget!)

LOVELY LEMONS ENVELOPE
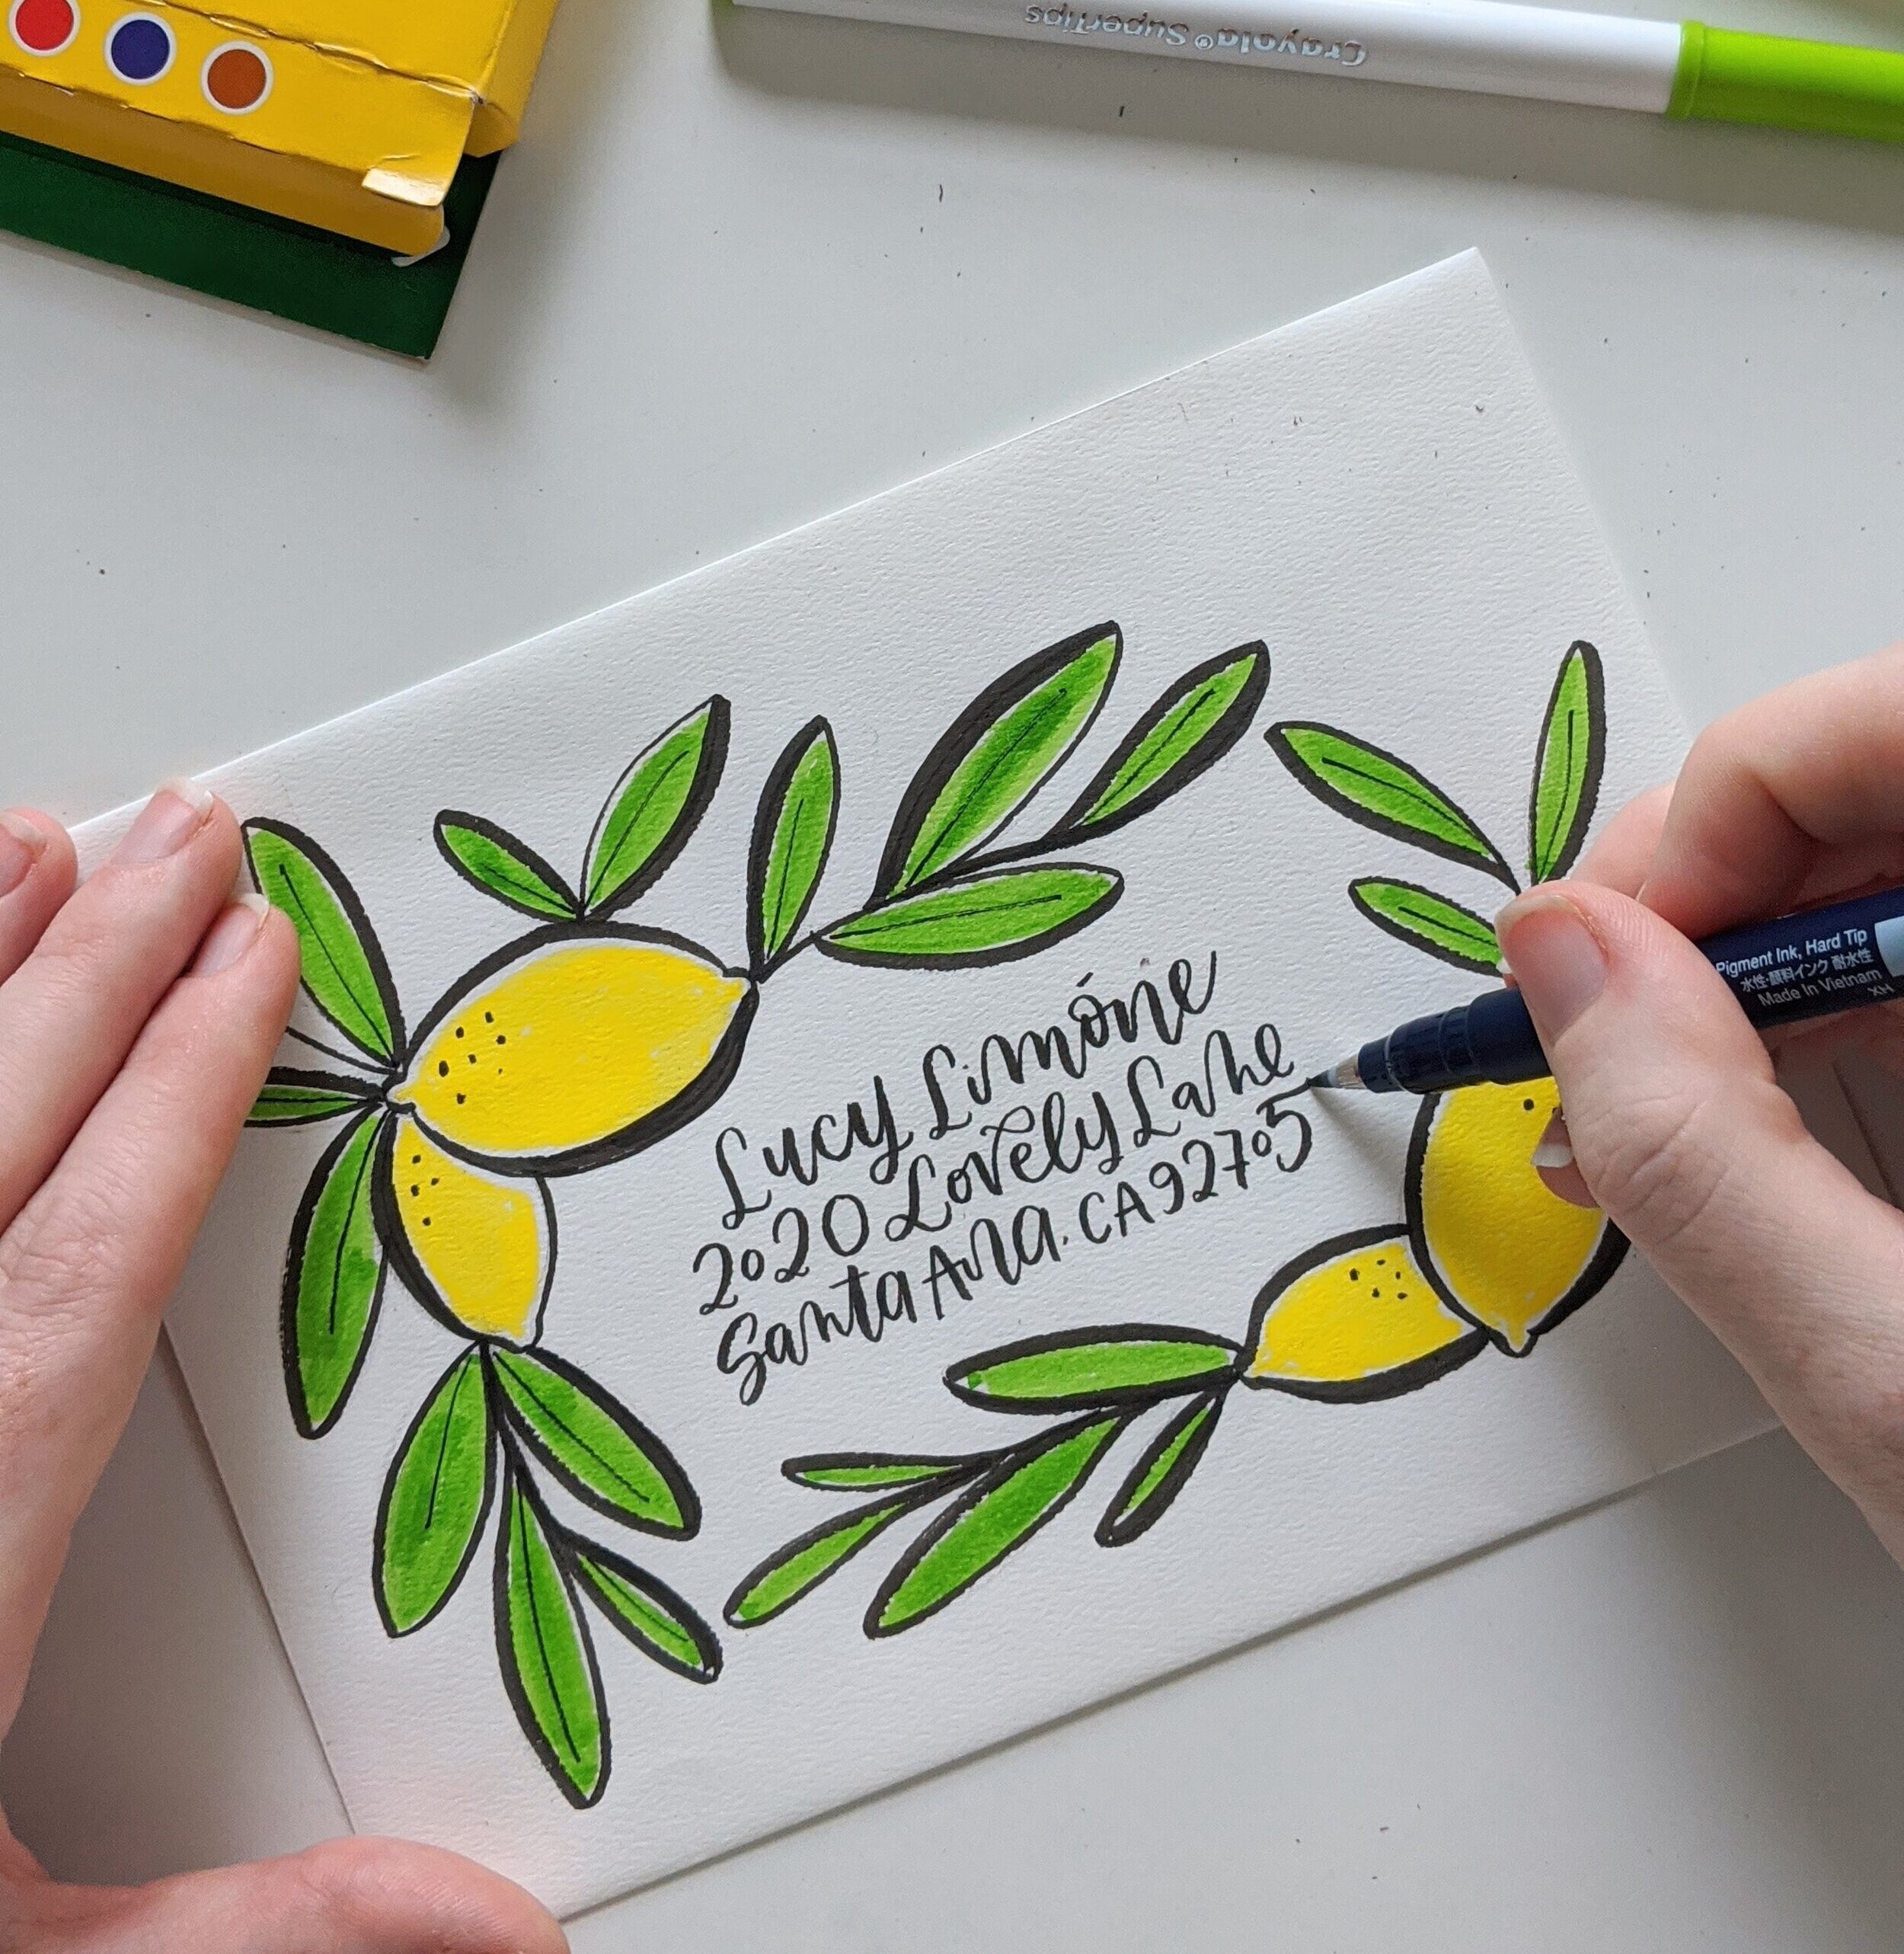
Here in Arizona, the lemon trees are full. Sadly, we don’t have one, but my brother- and sister-in-law do, and it is divine. Our girls pick lemons off the trees and make lemonade, and it’s so adorable my heart nearly explodes every time. That was the inspiration behind this citrusy design! For this envelope, you’ll need:
Pencil & eraser
Yellow & green markers
Black pen
Ruler/t-square
First, we want to make a note of where our stamp will be. We don’t want to go through all this work just to see our beautiful design covered up. I give the stamp a little breathing room on all sides. (NOTE: be sure to keep your pencil lines light as you’ll need to erase them later — mine are a little darker than I would normally do so you can see them in the photo!)

Next, we want to mark our address square. Measure out the distance from the right edge of your envelope to the left edge of where your stamp will be — for me, that’s 3.5 cm. Draw a vertical line that distance from the right edge and the left edge. Measure about an inch from the bottom of your envelope and draw a horizontal line. Then take your ruler/t-square a centimeter or so below the bottom edge of your stamp and draw your second horizontal line. Now you have a neat little address box!

Now it’s time to start sketching! Don’t consider yourself a great drawer? Not to worry! We’re gonna break this down real simple. Draw two overlapping ovals in the top left and bottom right corners of your address box. It’s totally fine to overlap the box, but don’t go in too much as we need to maintain room for our address. Next, sketch a stem and some leaves coming from the tops of your lemons. Remember, leaves are organic… therefore, imperfect. Don’t worry about making them perfect. Now fill in the space along the edges with more leaves emerging from the lemons. Keep filling it in until you feel you have a nice balance — again, be sure to avoid the stamp area!
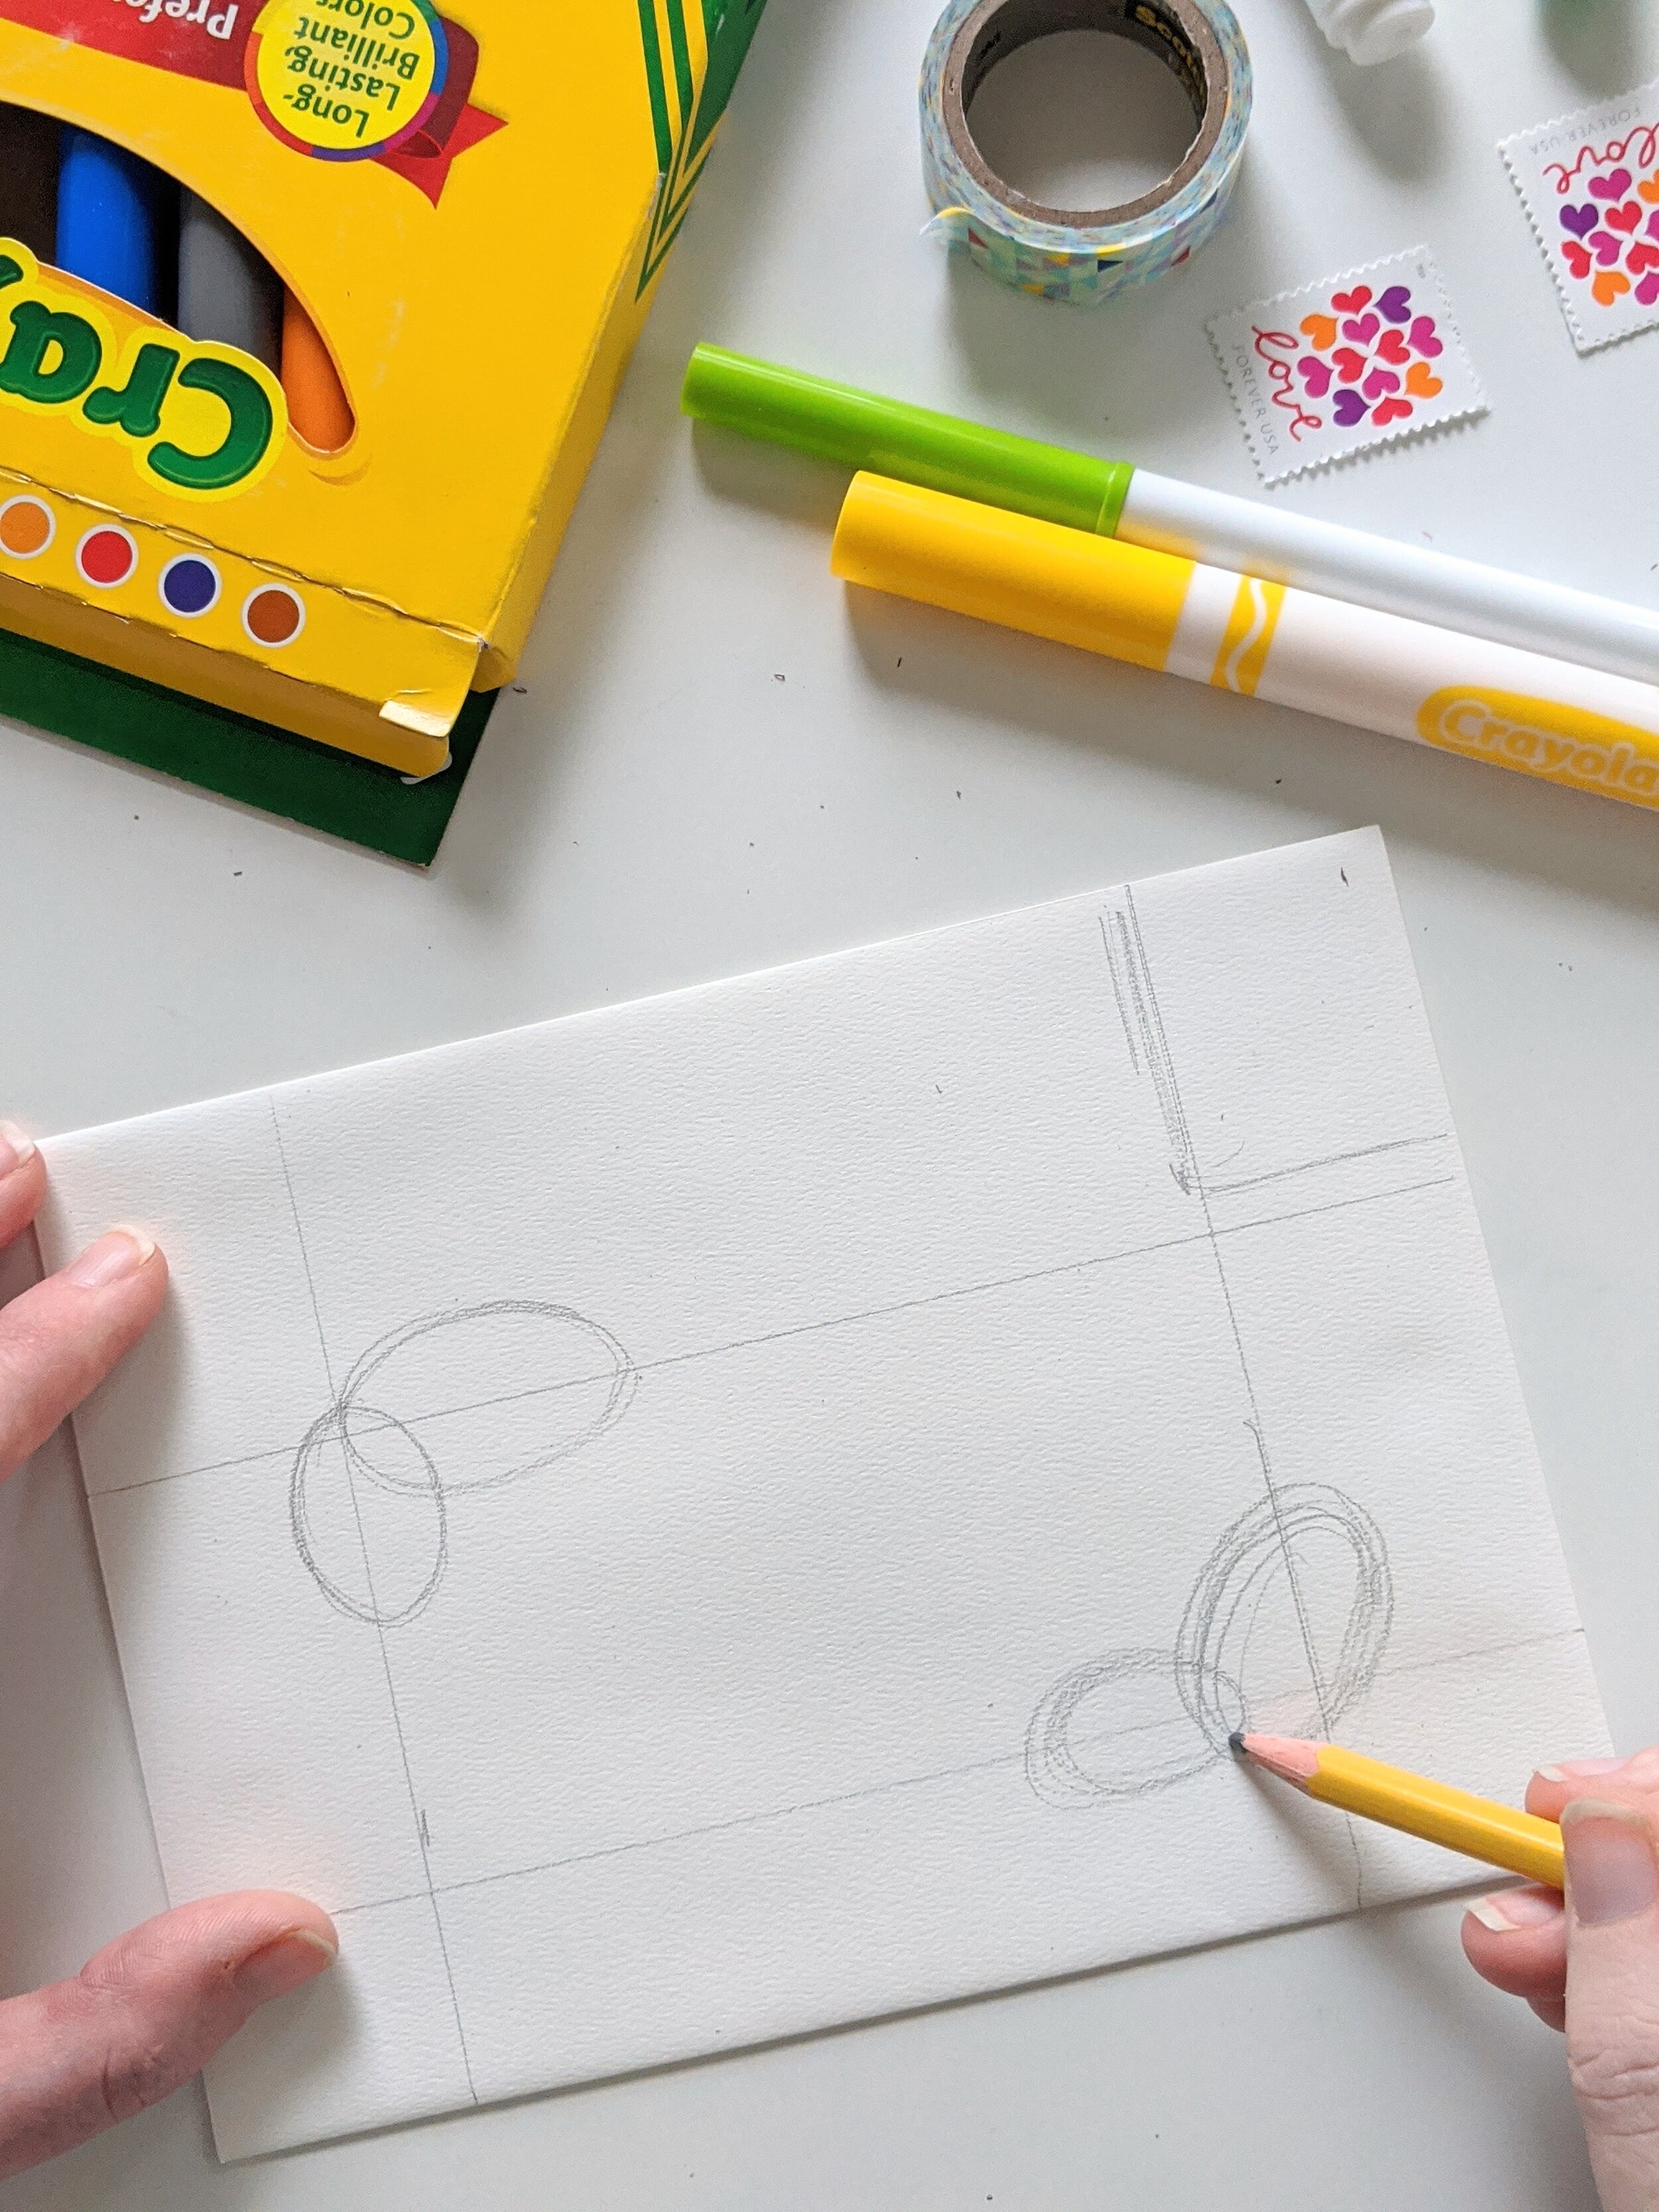
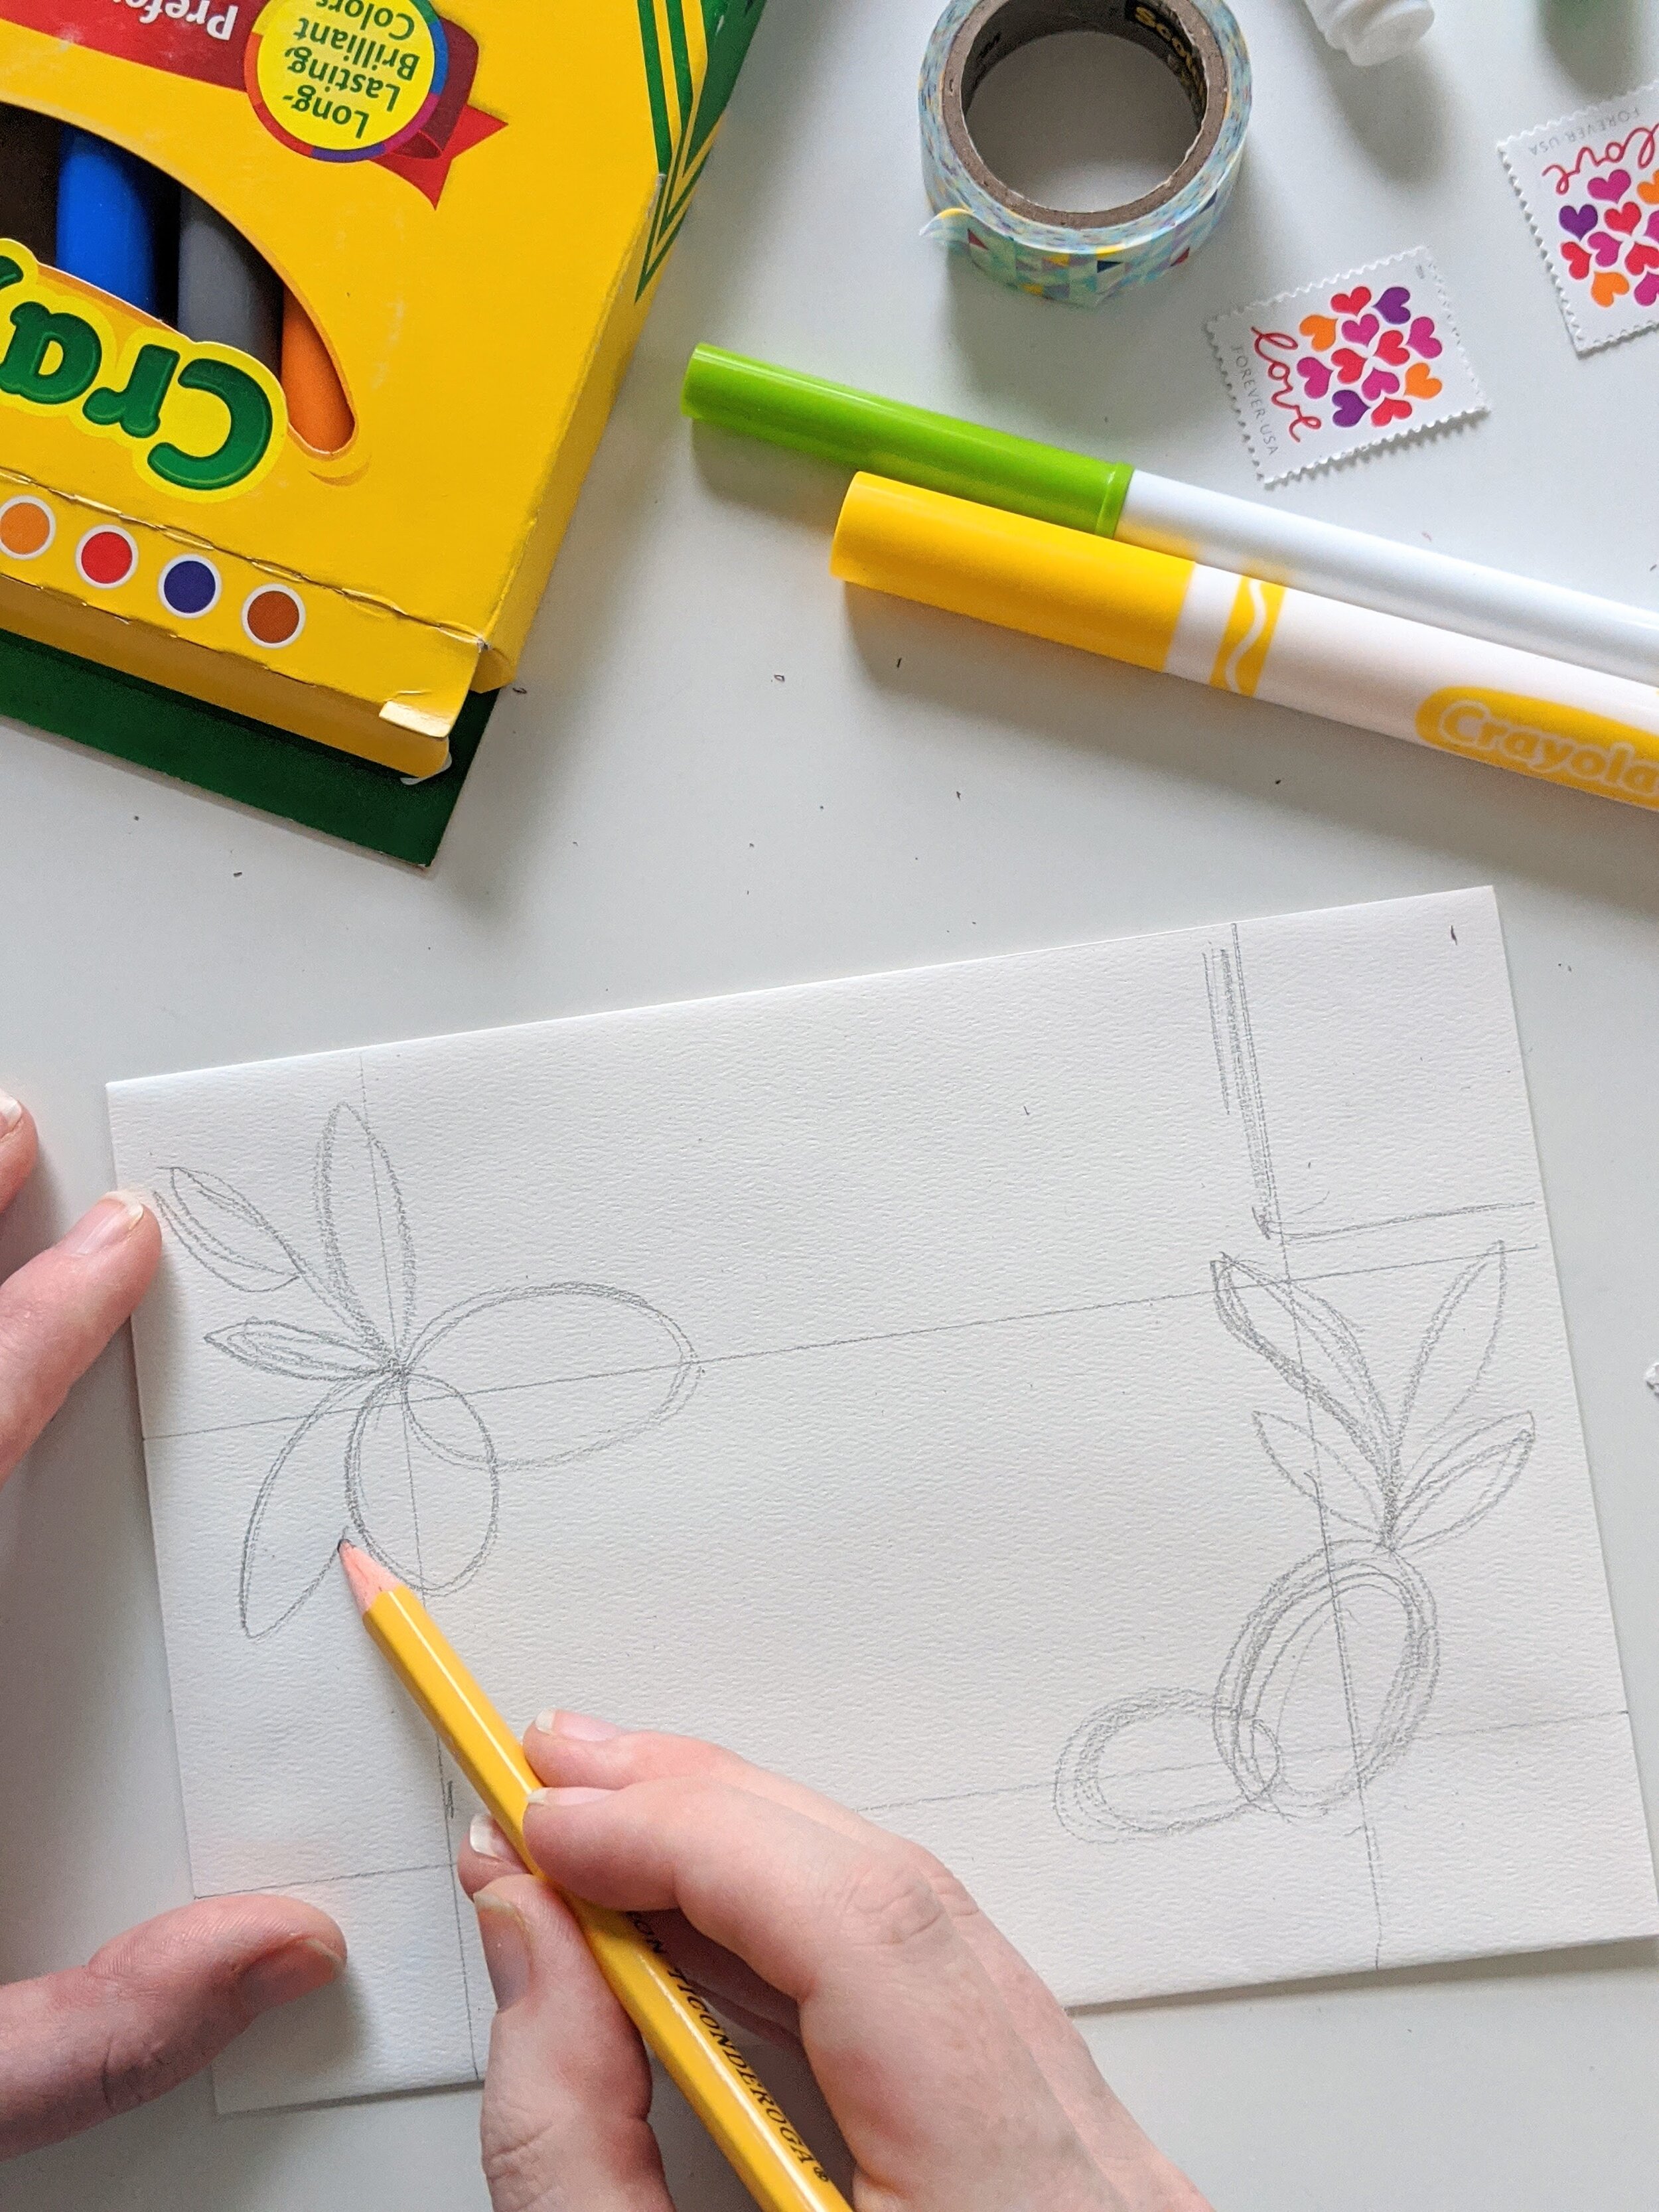

Now we’re going to make our ovals look a bit more like lemons by adding little knobs on the top and bottom.
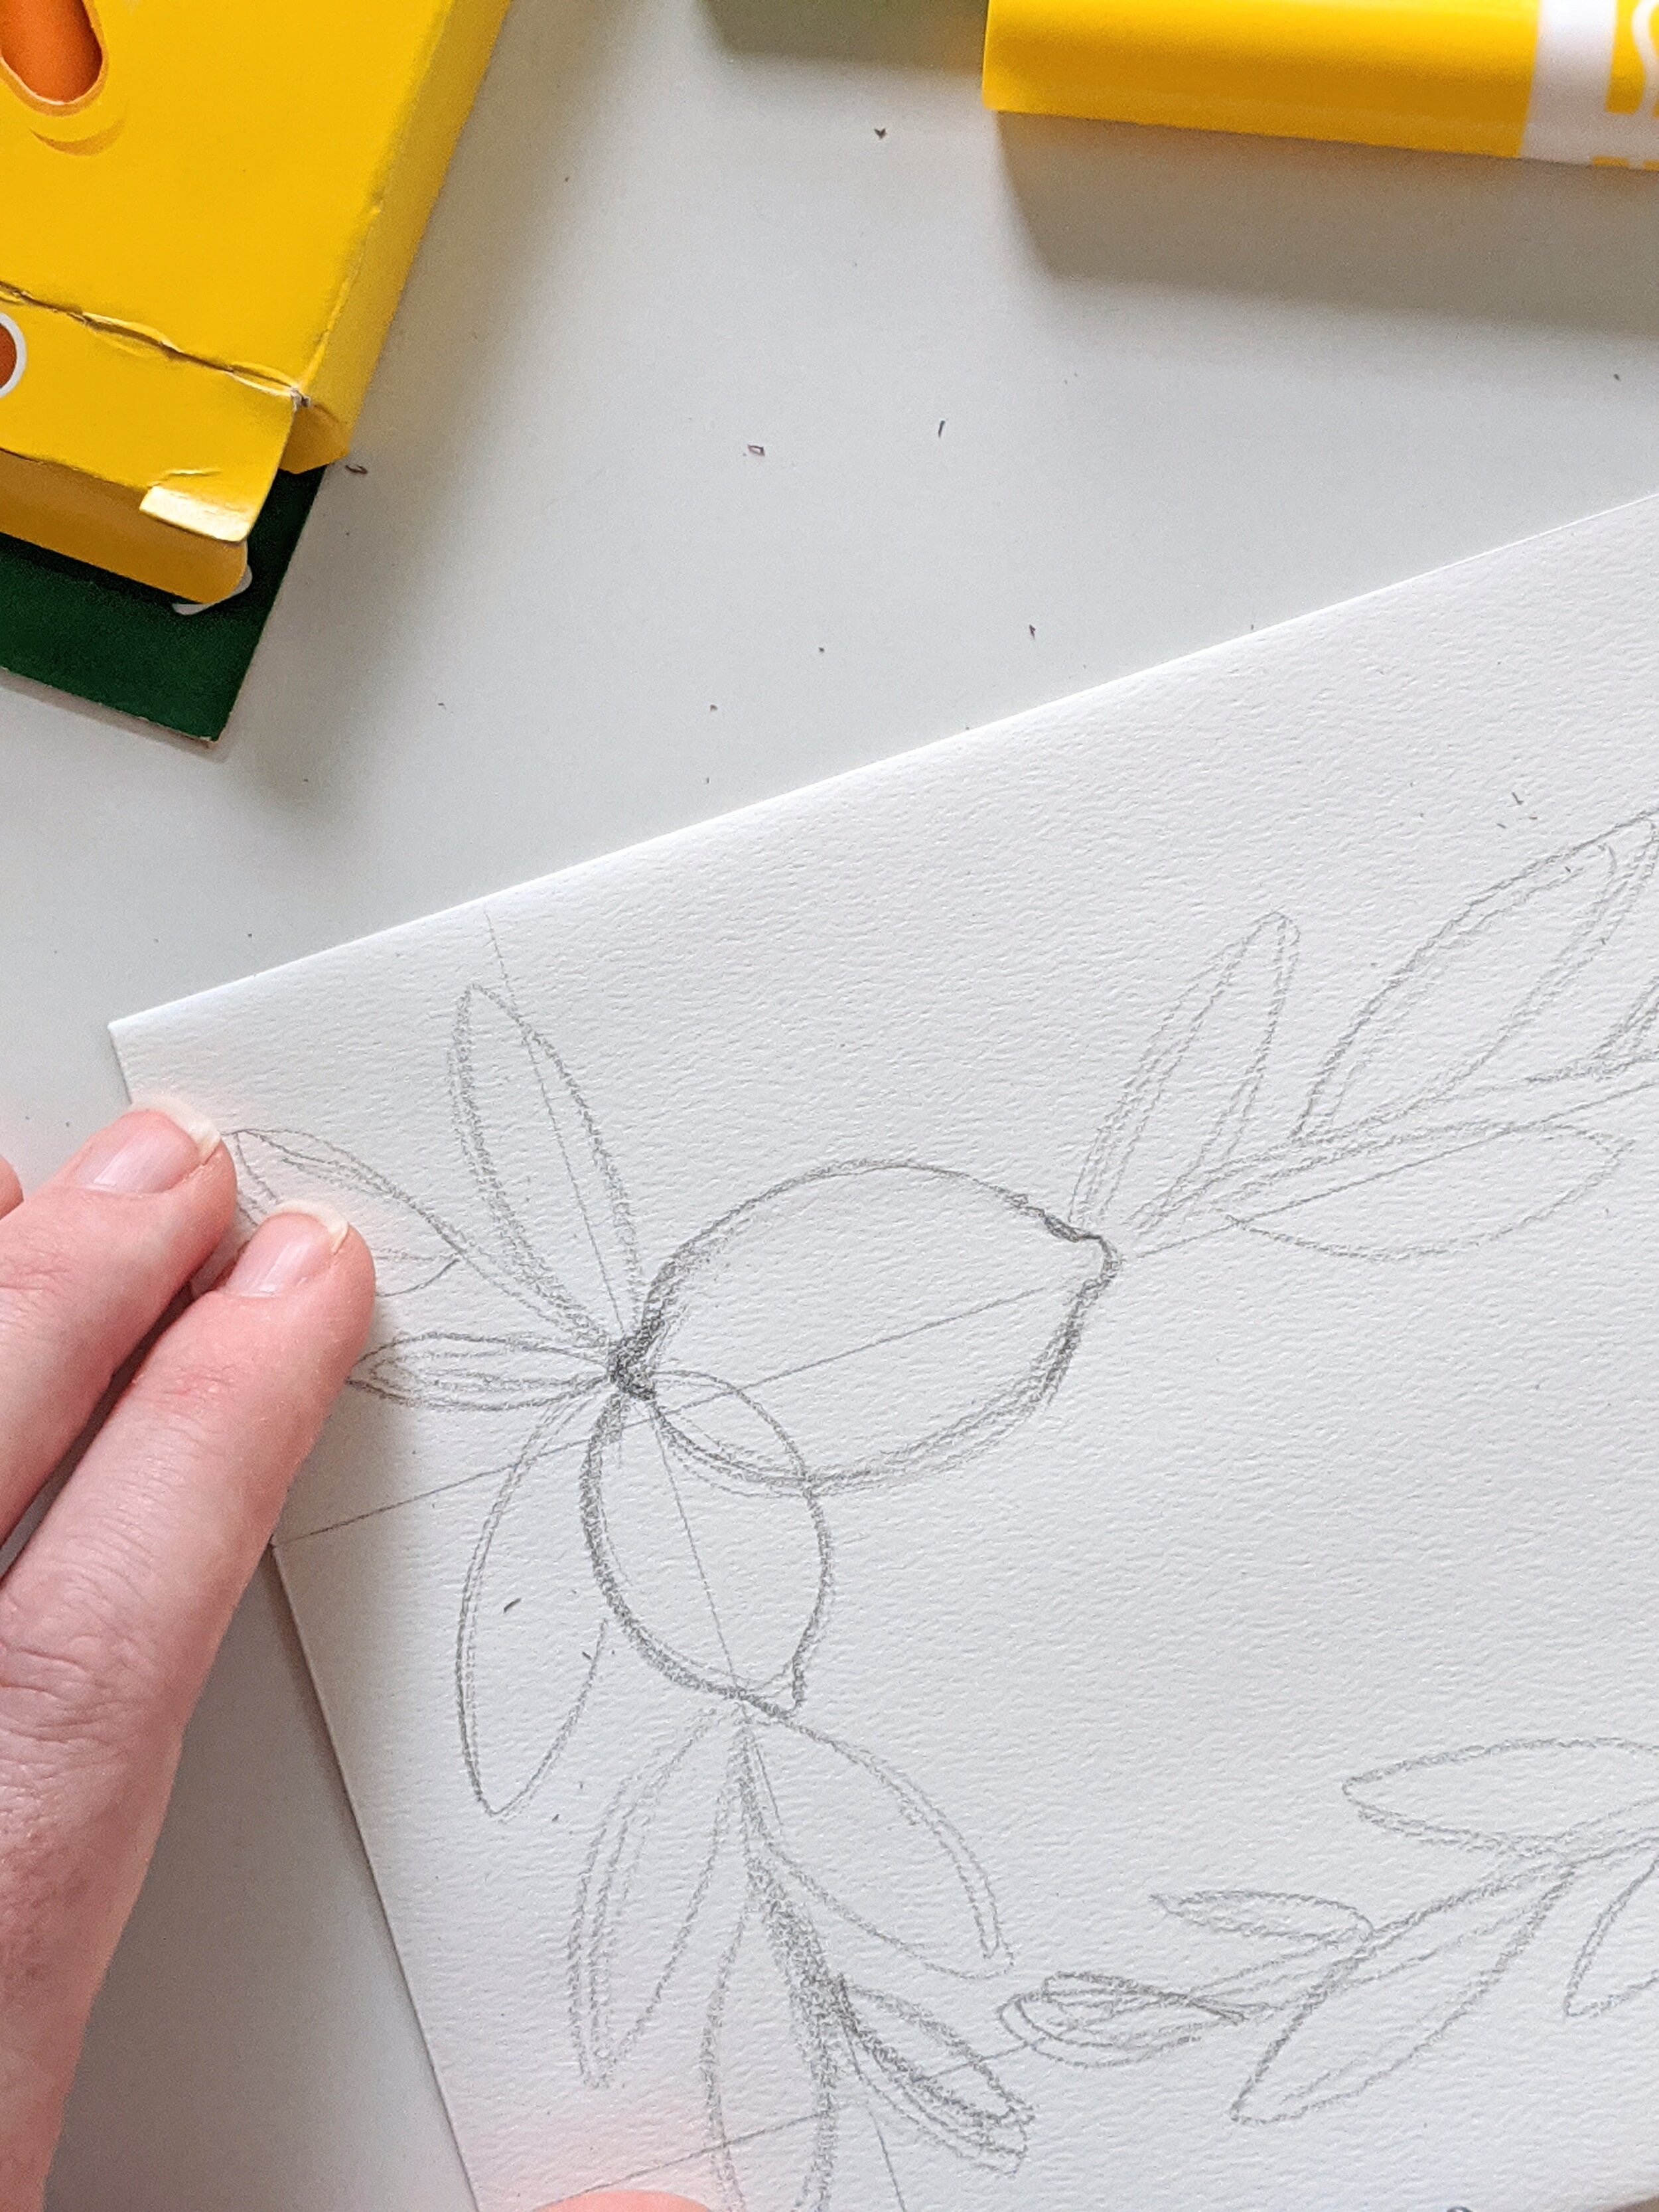
Oooh, it’s really starting to look pretty, isn’t it? Now it’s time to trace over your sketch with a black pen or marker. I am using a Tombow Fudenosuke because I really want some variation in the thickness of my lines to give it a bit more interest. You can mimic this effect by building up lines to make them thicker. Once the black ink is down and you’re SURE it’s dry, start erasing your sketch and guidelines.
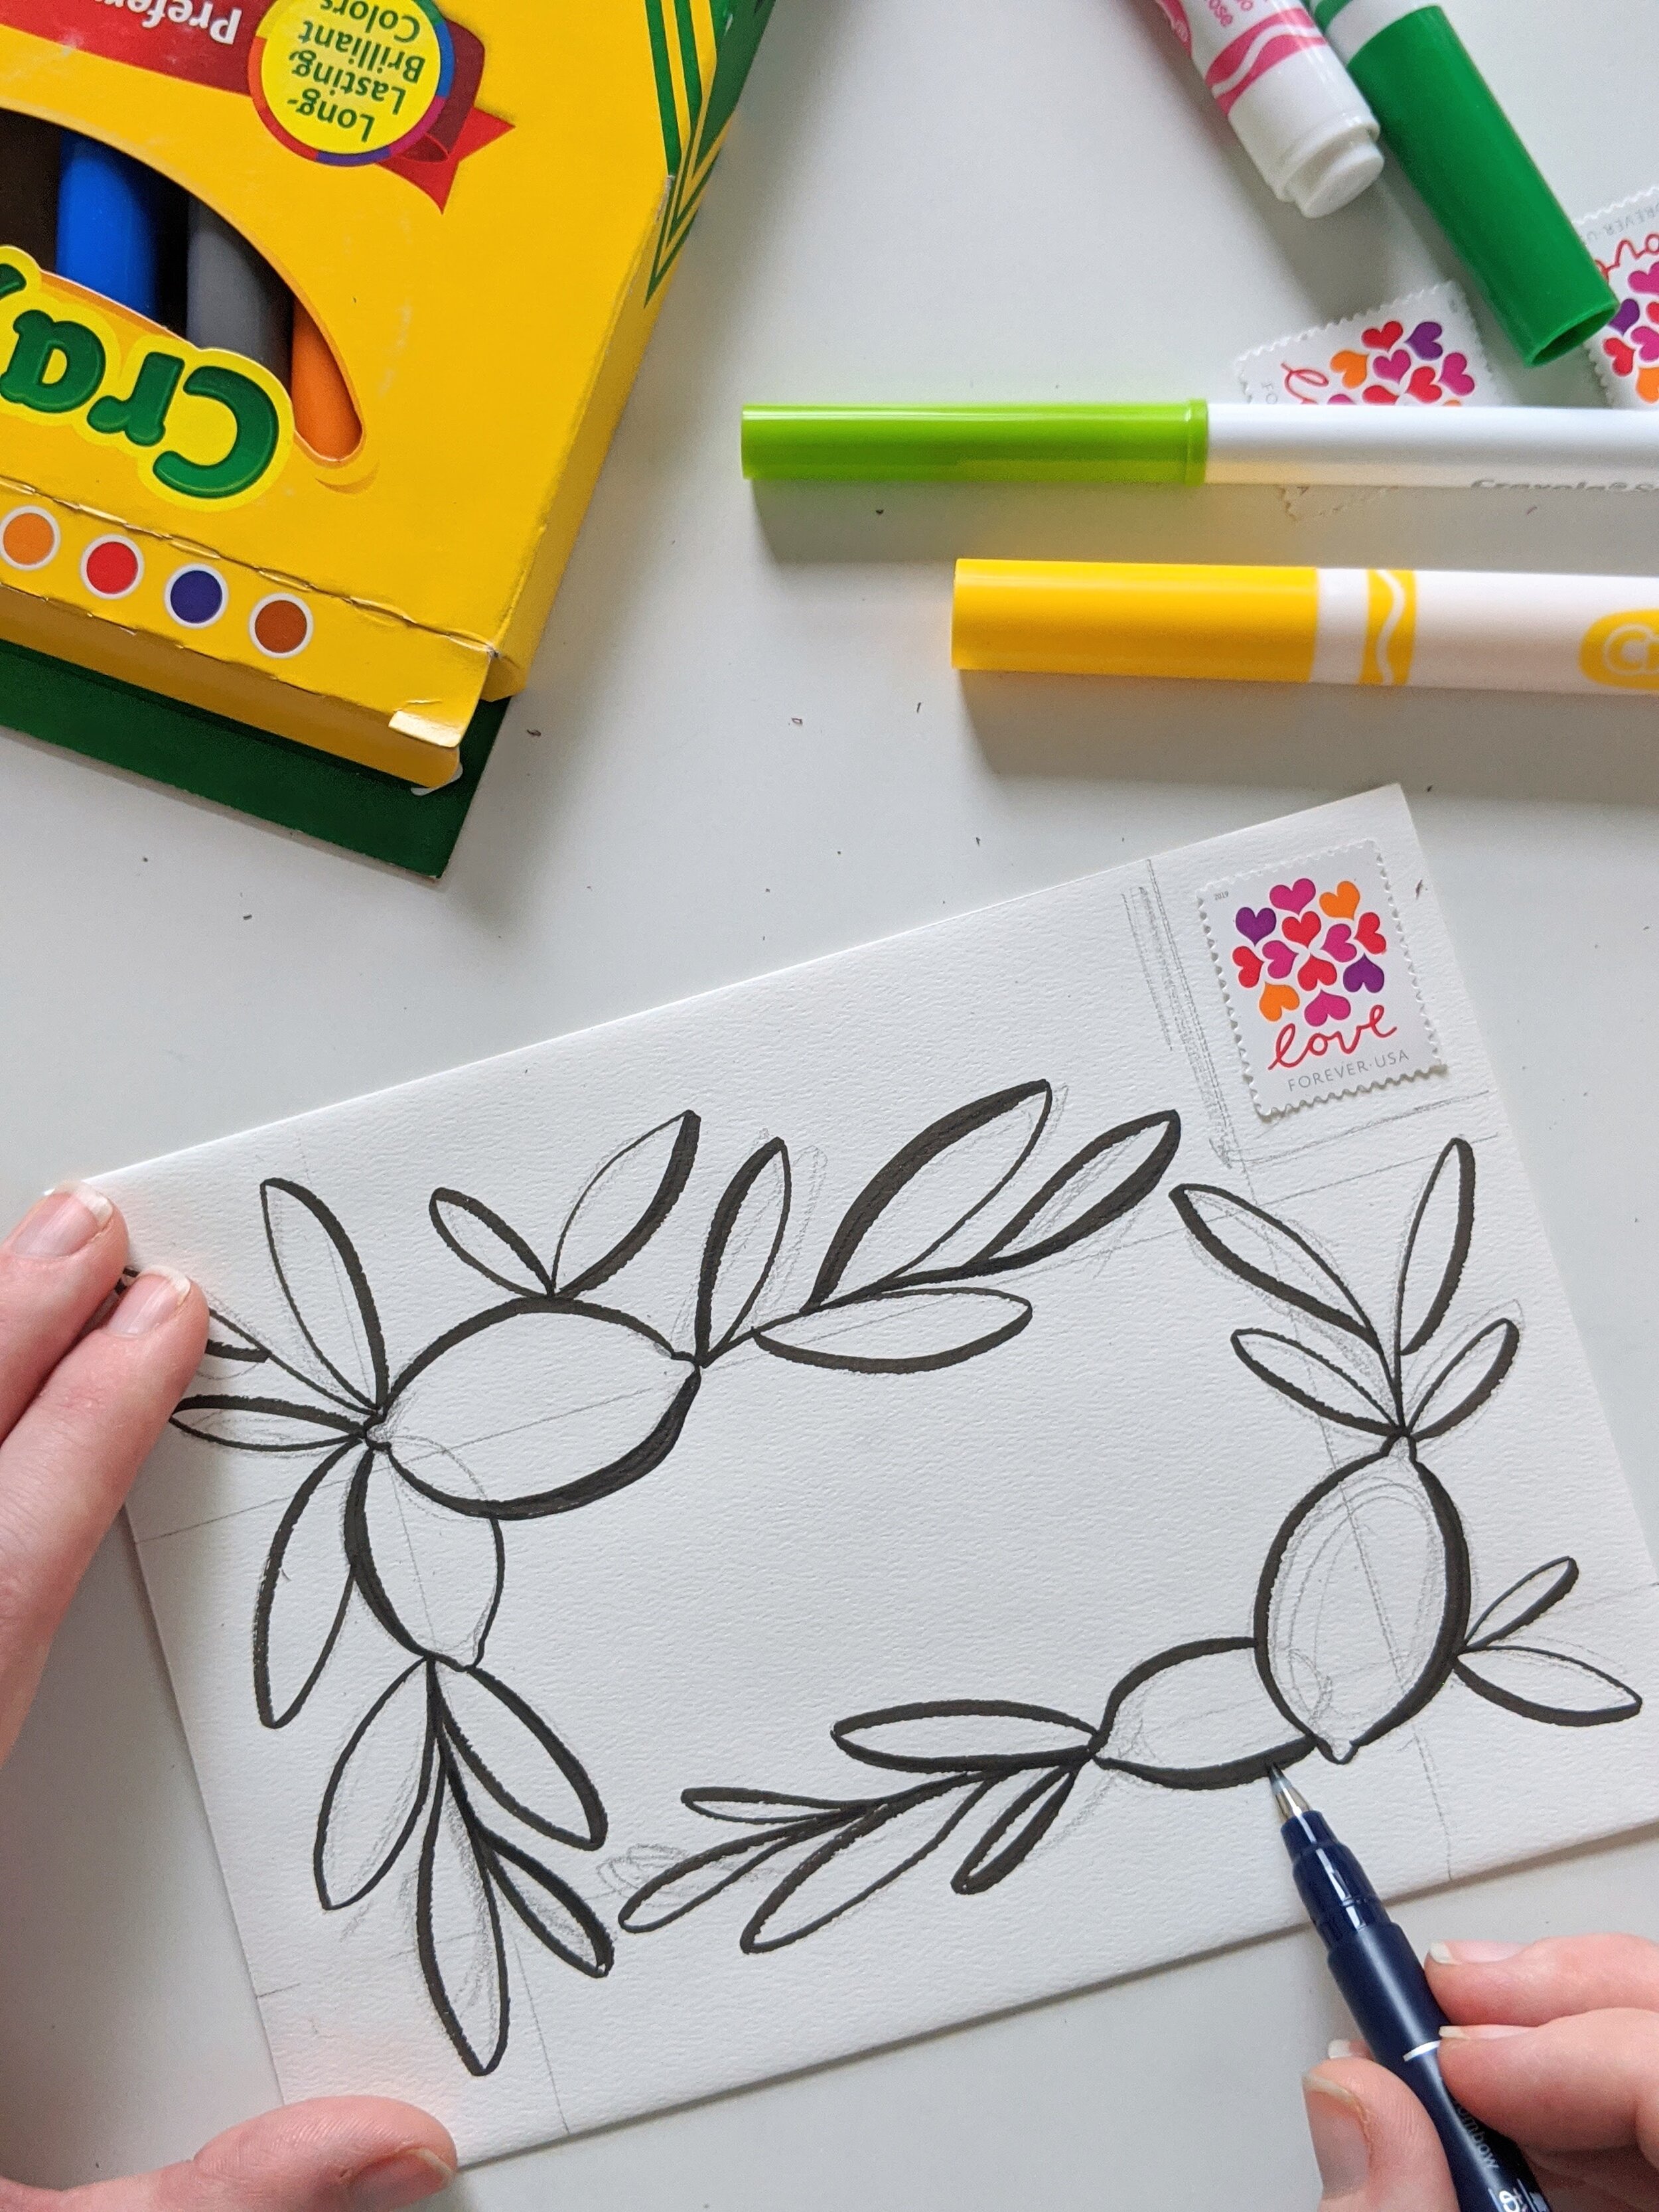

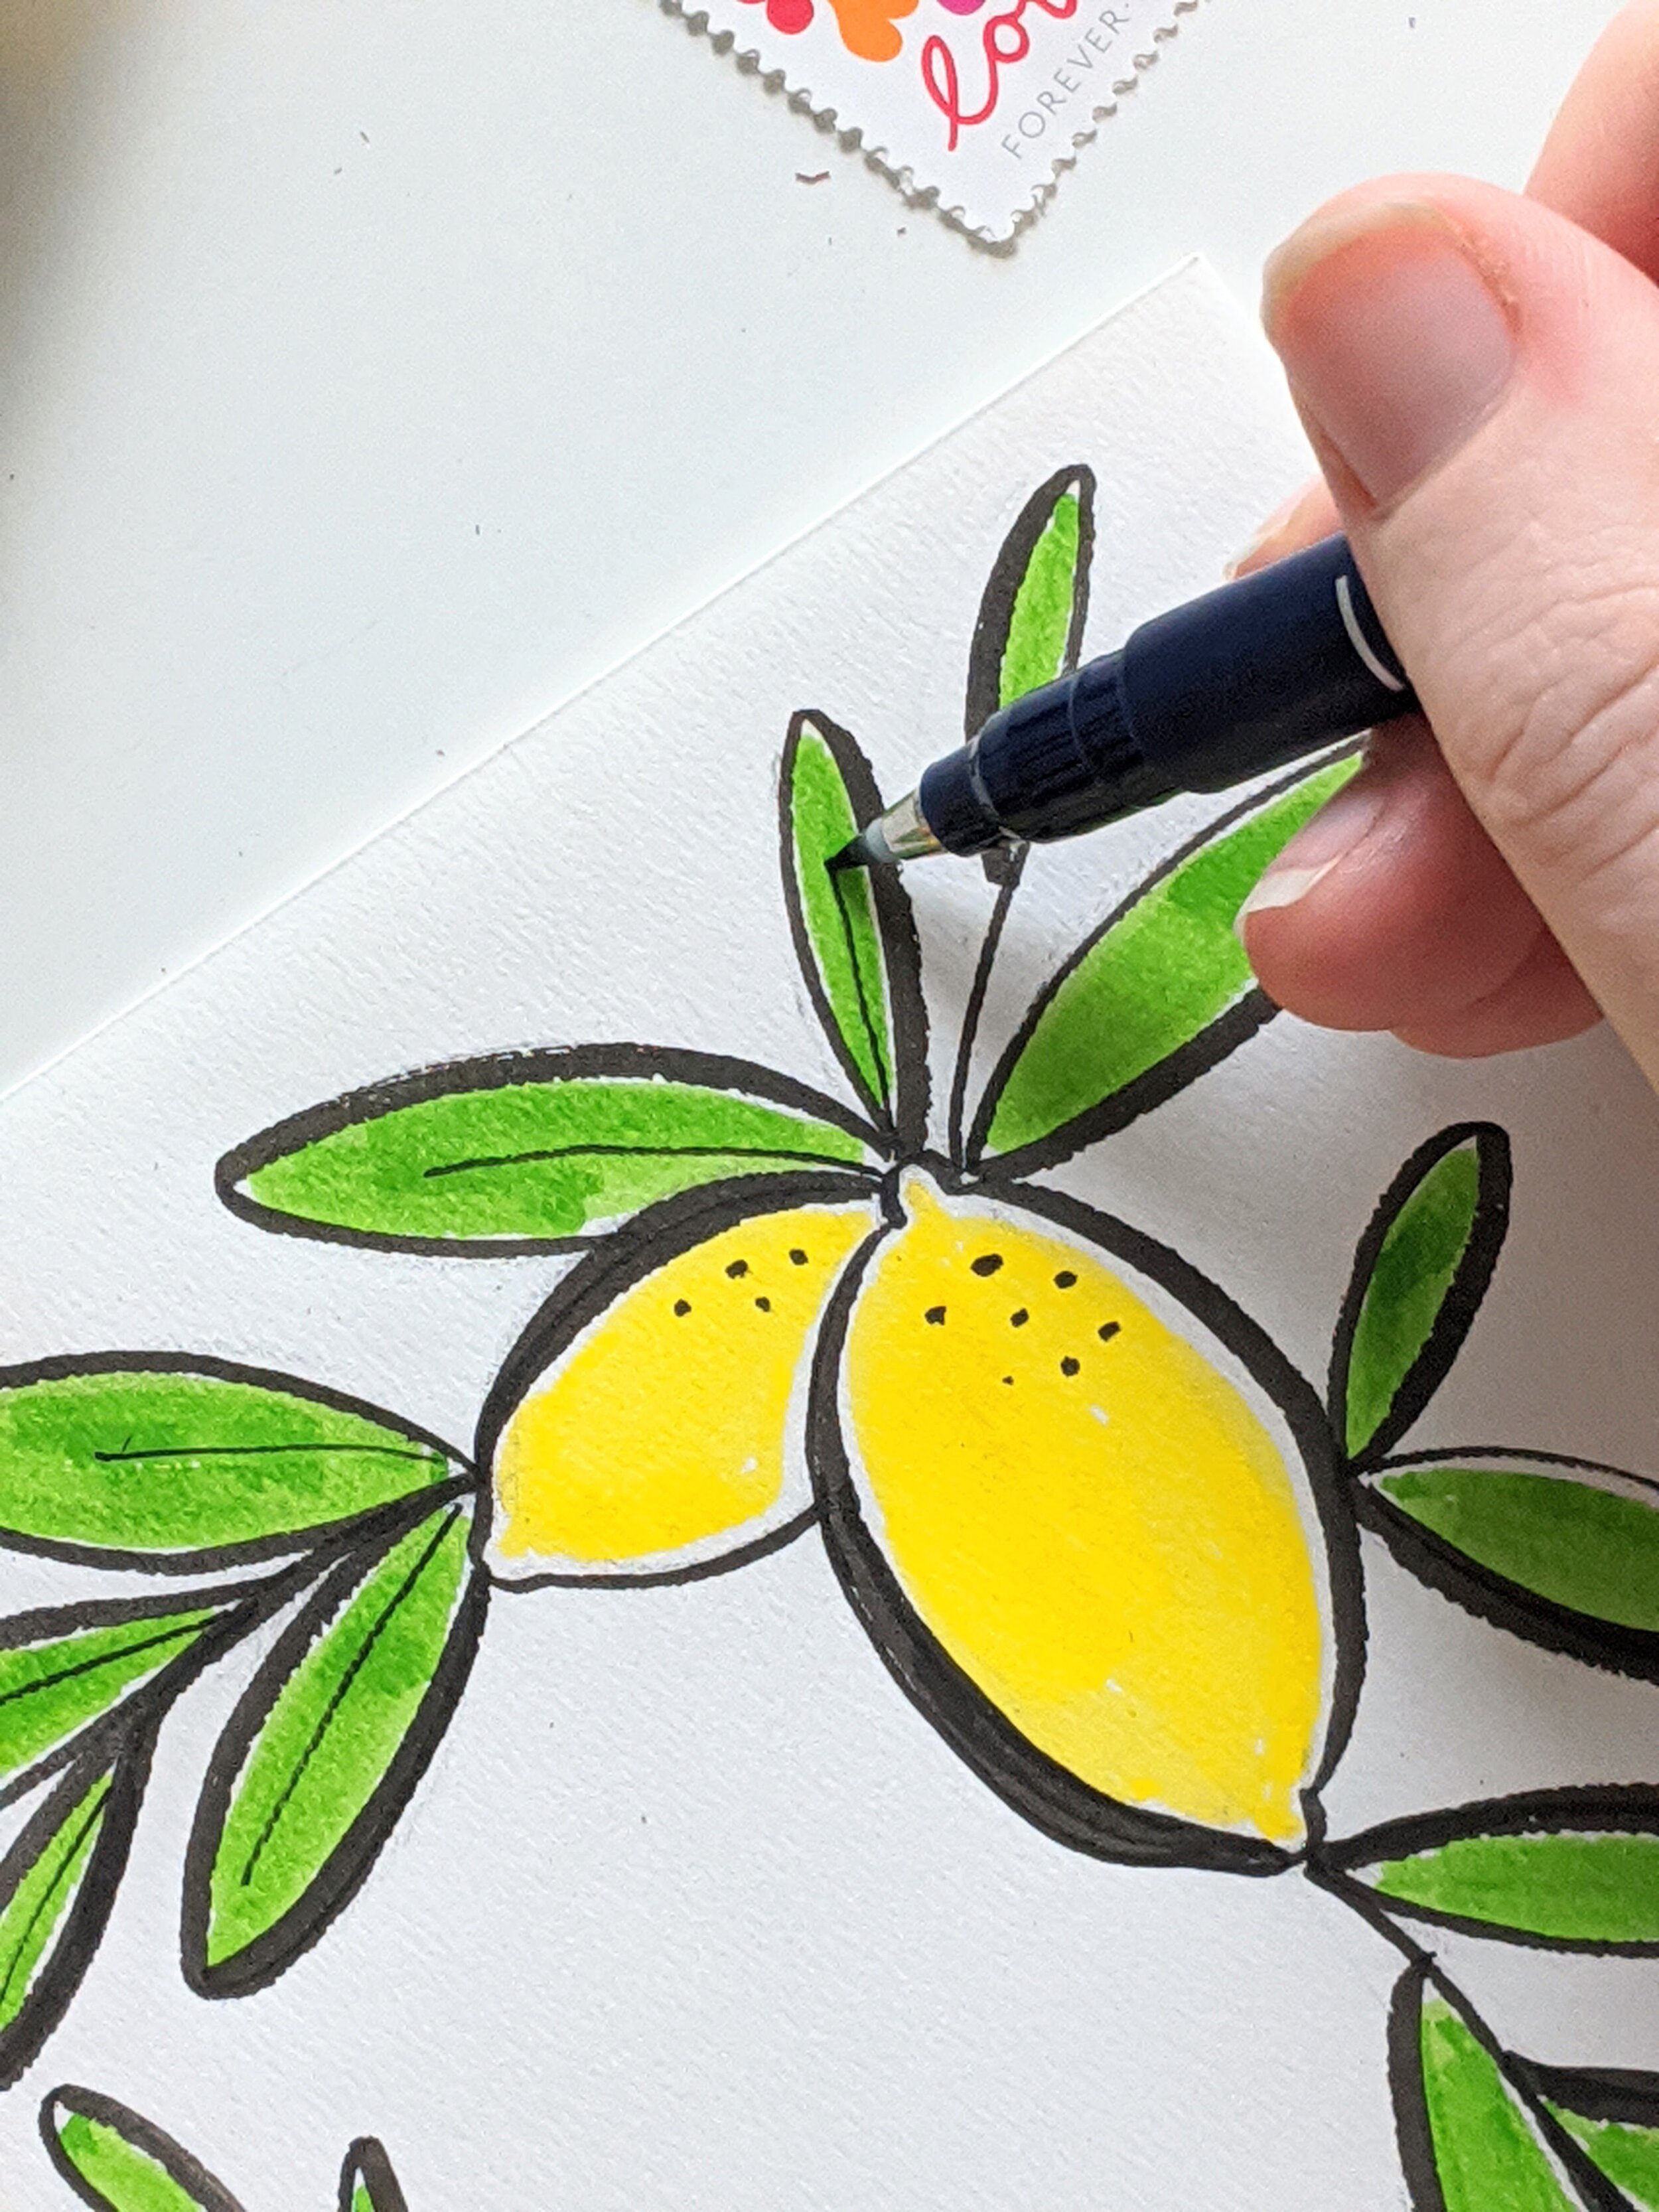
Time to color! Fill in the lemons with yellow. Be super careful to avoid coloring over the black lines, especially if you’re using a Crayola marker — it will drag some of the black ink with it. Now add your green! I’m using a light green SuperTip, but use whatever you have on hand. I loooove the texture created by these Crayolas — if you layer it thicker in some areas, it gives it a very painterly look. Now how about some details? Take your black pen and add some small dots to the lemons and center veins to the leaves.


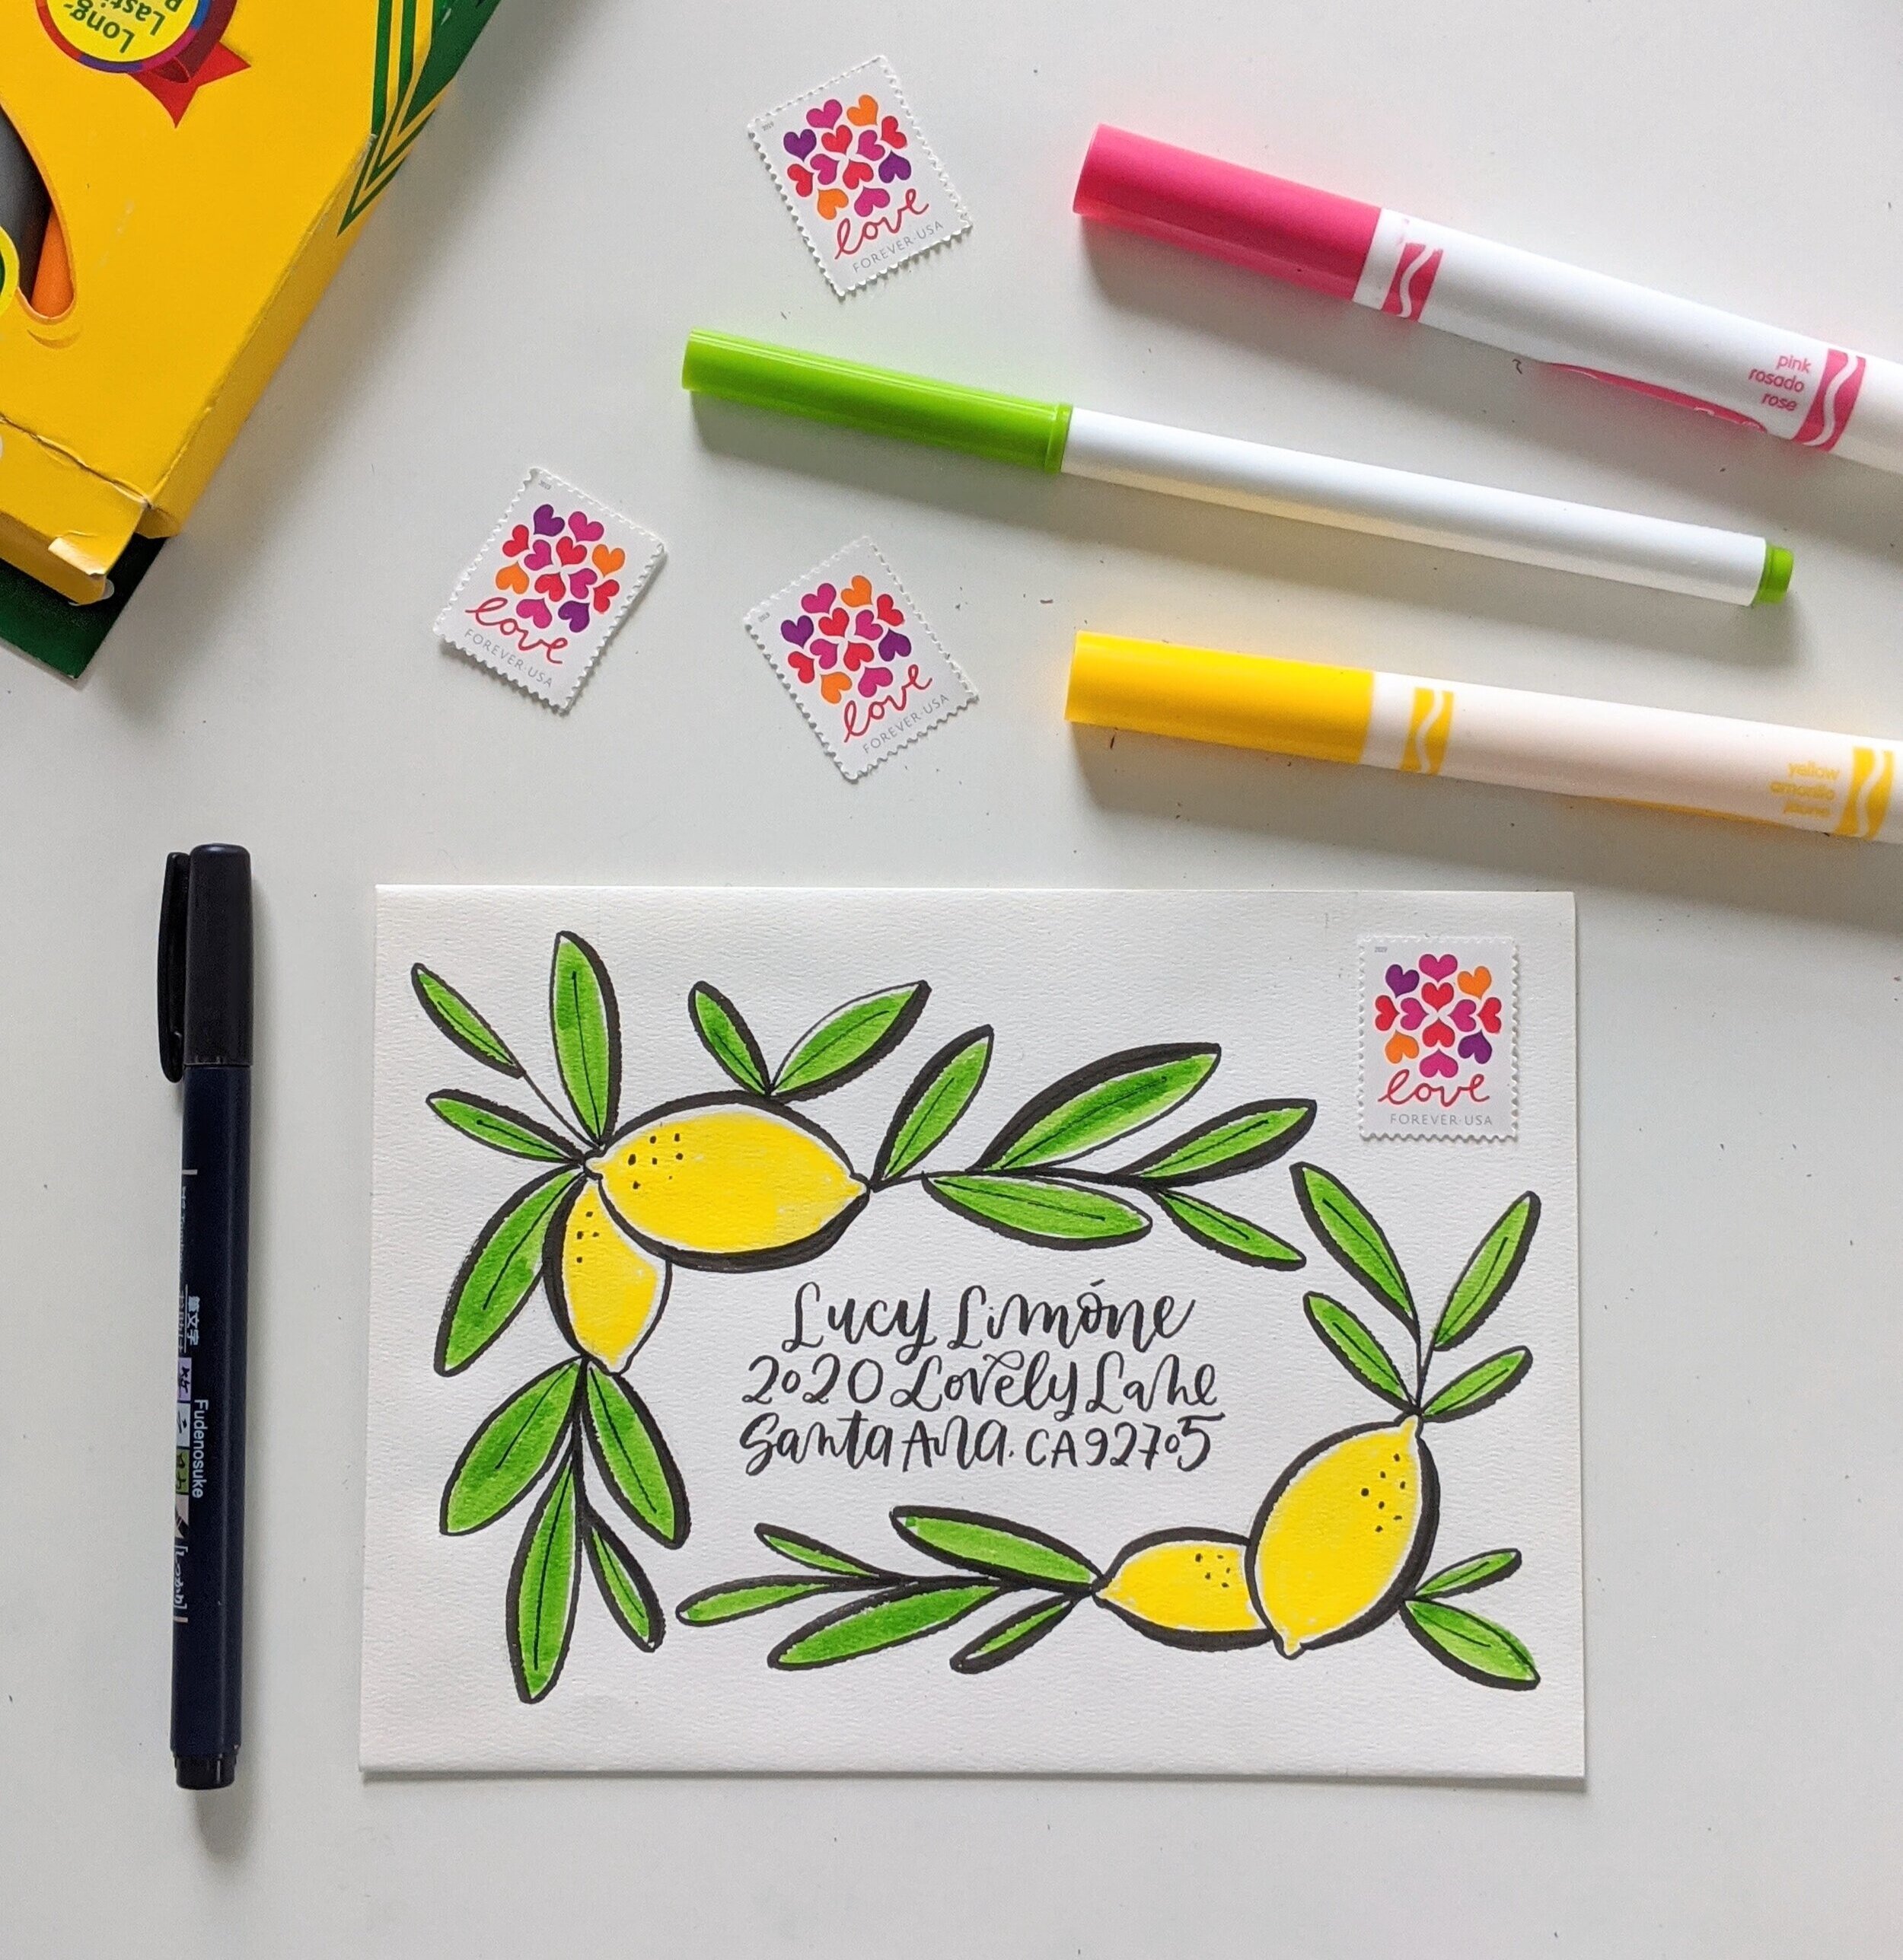
Now that your lemons are done, it’s time to script out your address! For a consistent look, use the same black pen/marker you used for the outline. When you’re done, if you notice any space that needs to be filled with some leaves, feel free to add in.
Wowowow, look at that! Look at YOU! Pat yourself on the back because that is one fine looking envelope.
TERRAZZO FLORAL DOODLE ENVELOPE
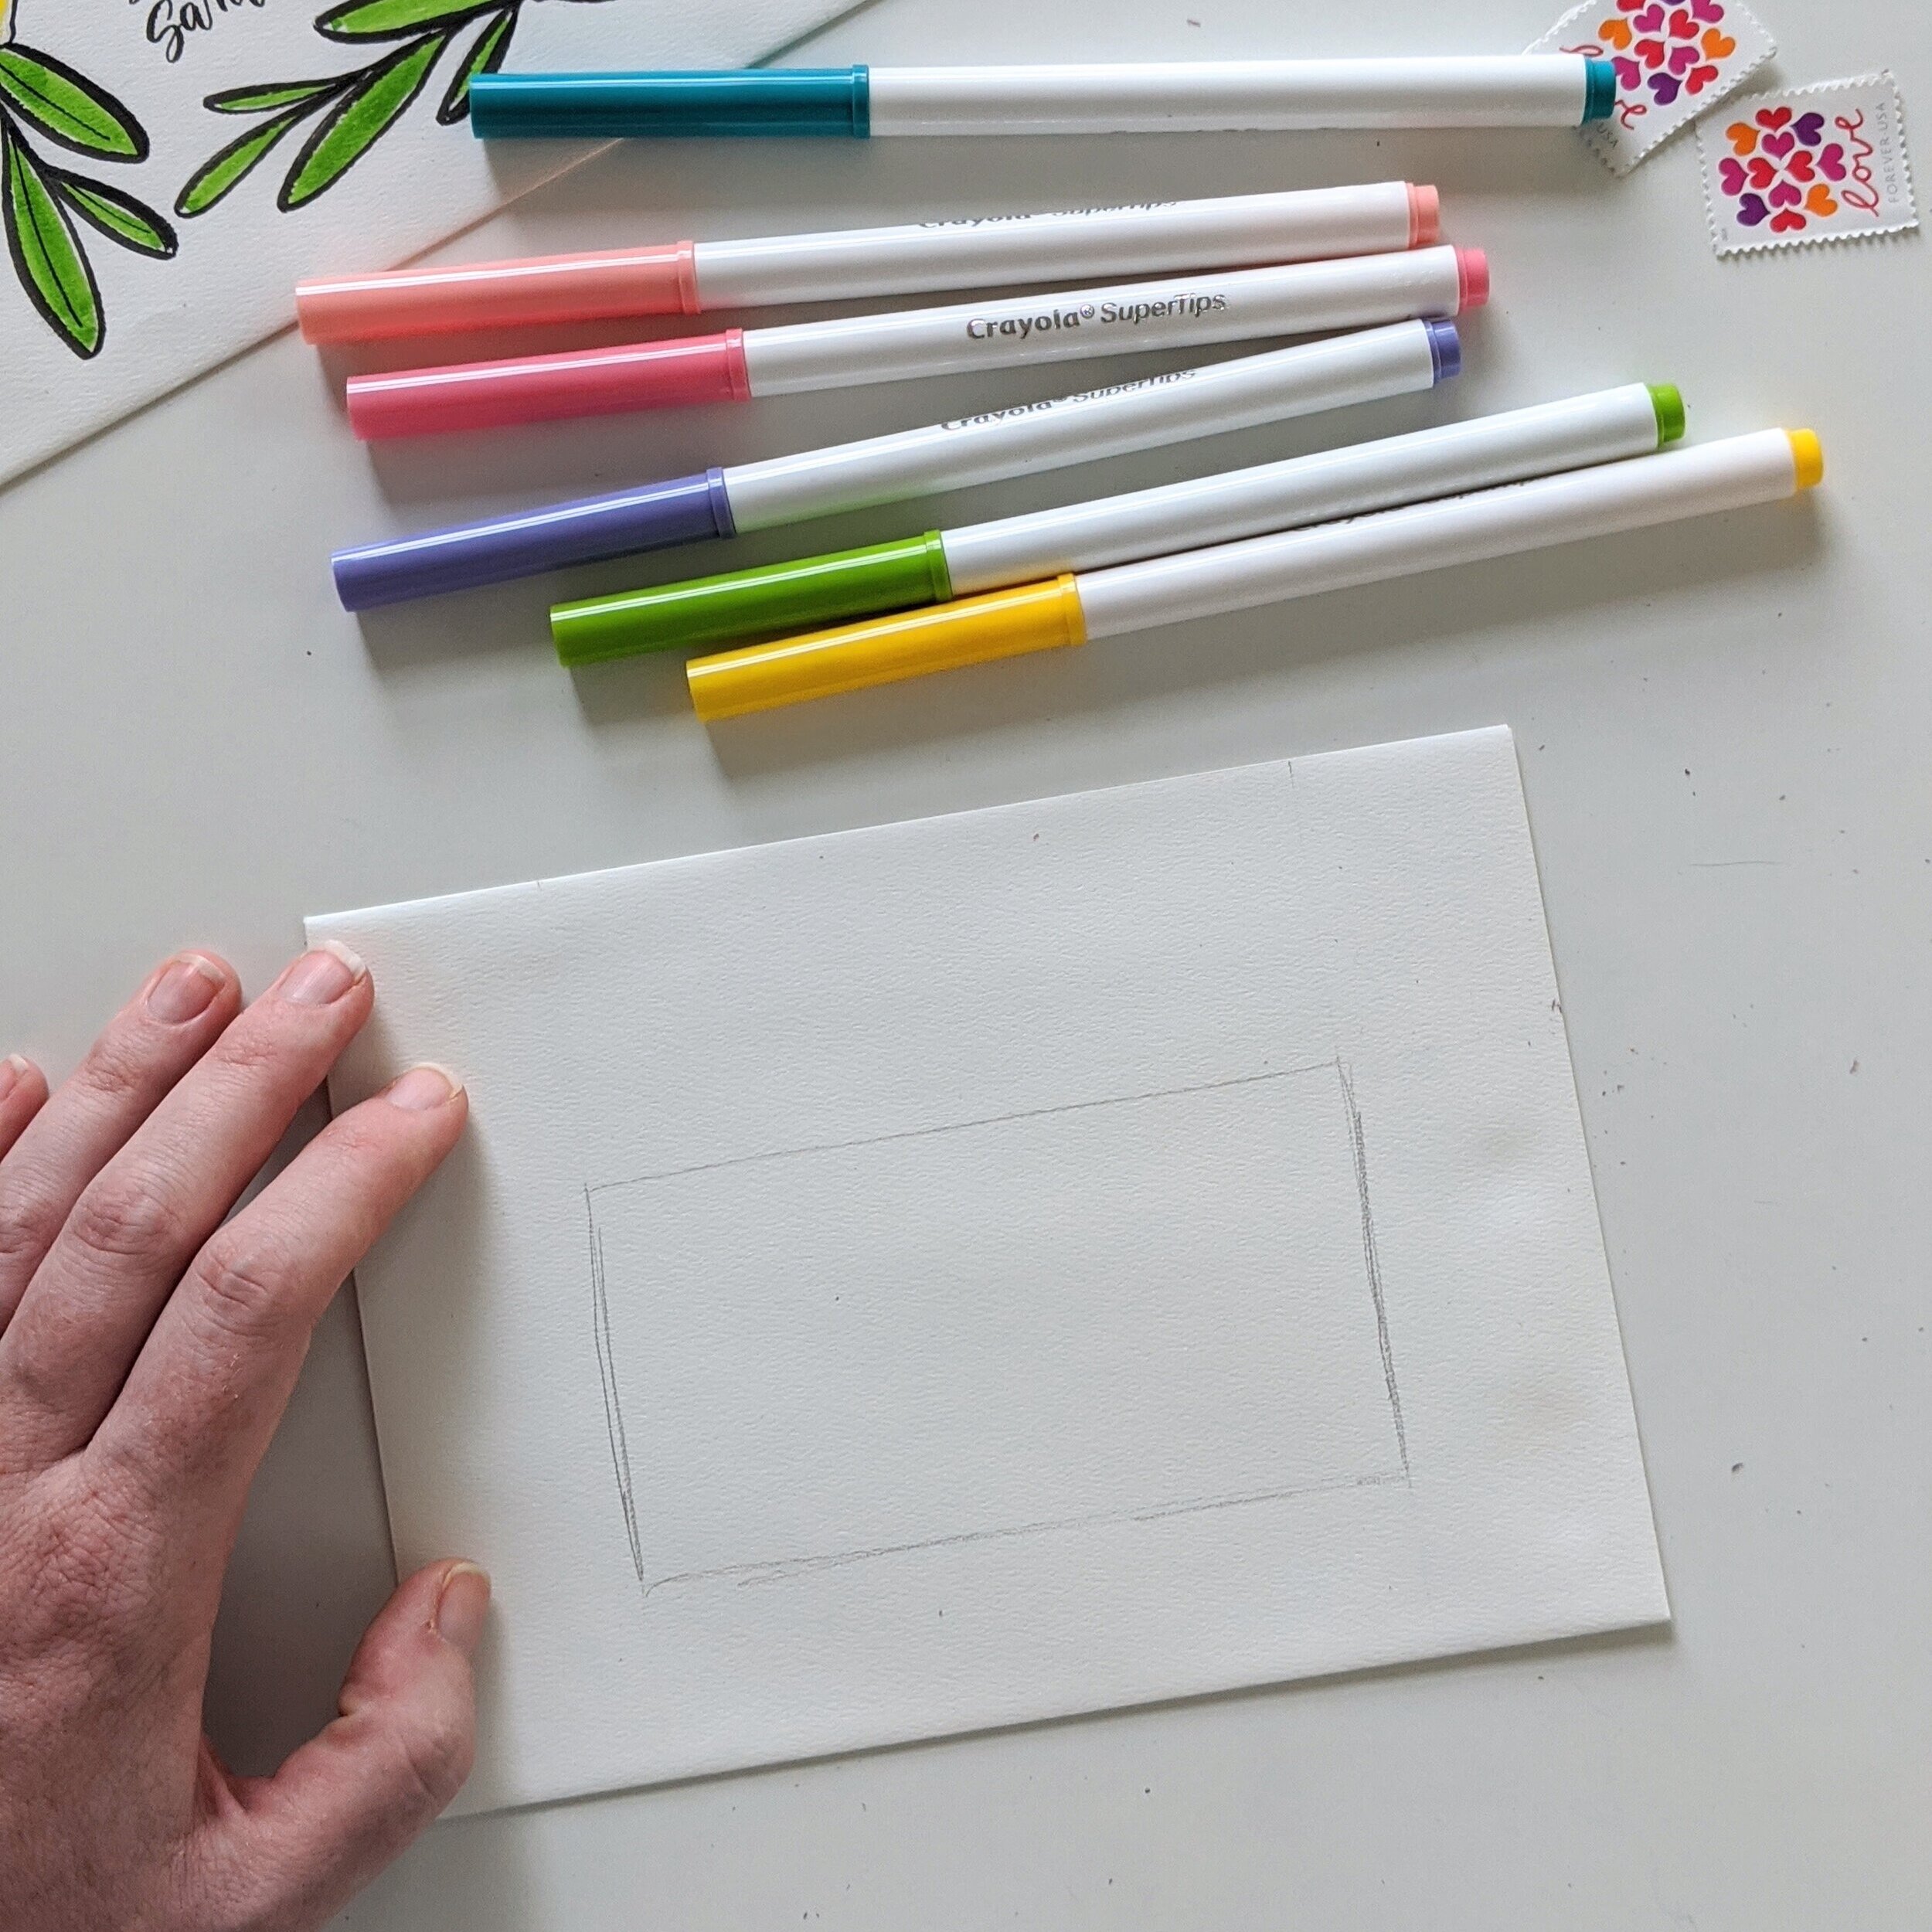
Okay, as much as I LOOOOVE the Lovely Lemons envelope, I think this may be my fave. It came about because I was trying to decide between doing a ditsy floral pattern or a spring-y terrazzo. So I decided, let’s try both! And I really couldn’t be happier with how it turned out. Here’s what you’ll need:
Pencil and eraser
Black pen/marker
At least 5 coordinating colored markers - make it spring-y!
Ruler/t-square
First, we’re going to make our address box just as we did in the Lovely Lemons tutorial. Unlike the Lovely Lemons tutorial, we are going to lay down our color BEFORE we lay down the black ink. And because many of these colors are light and see through, we want to erase any unnecessary lines now, leaving light pencil lines for your stamp and address box only.
Now it’s time to terrazzo! If you aren’t familiar with terrazzo patterns, give it a quick search on Pinterest and you’ll see why it’s the stuff dreams are made of. We’re going to mimic this with our colored markers by making organic, blobby shapes allllll over our envelope (except for the address box and stamp, of course). You can do this in any method you want, but my recommendation is to start with one color and draw evenly spaced blobs throughout the available space. I started with pink.

Then teal, yellow and some green. Green will be the underlying color for our leaves, so feel free to make some of these long and thin to fill in some empty space.
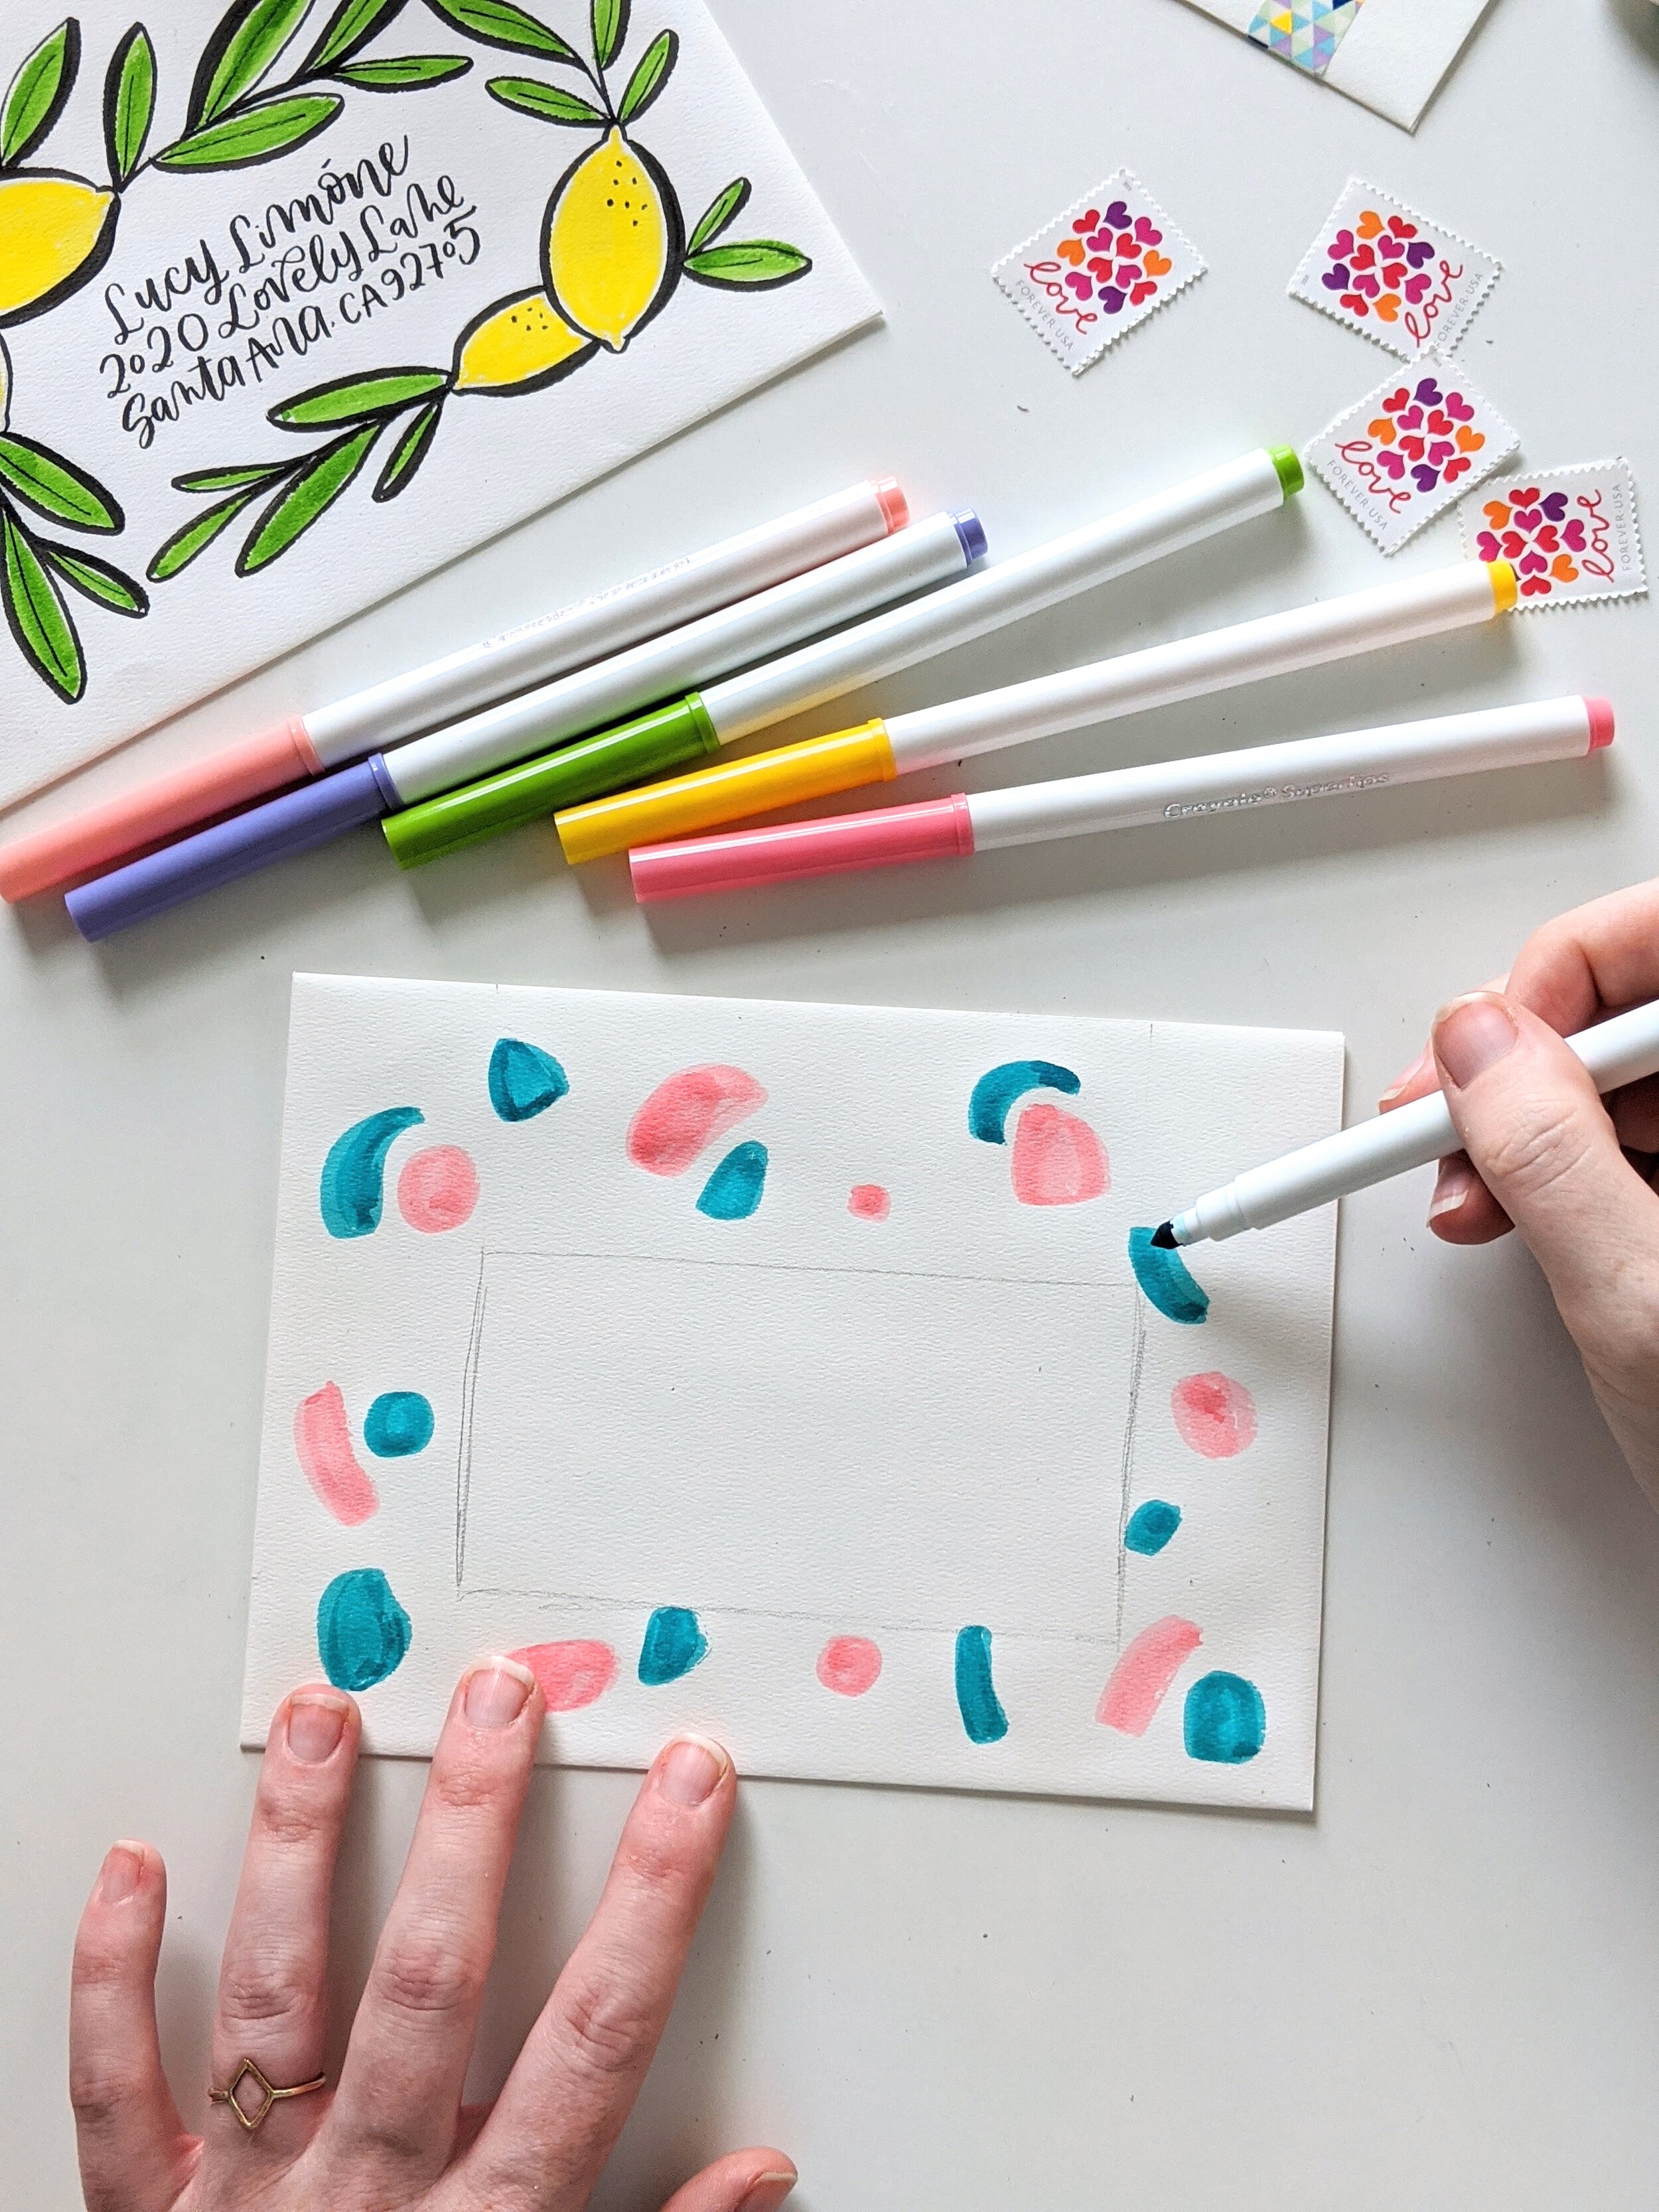
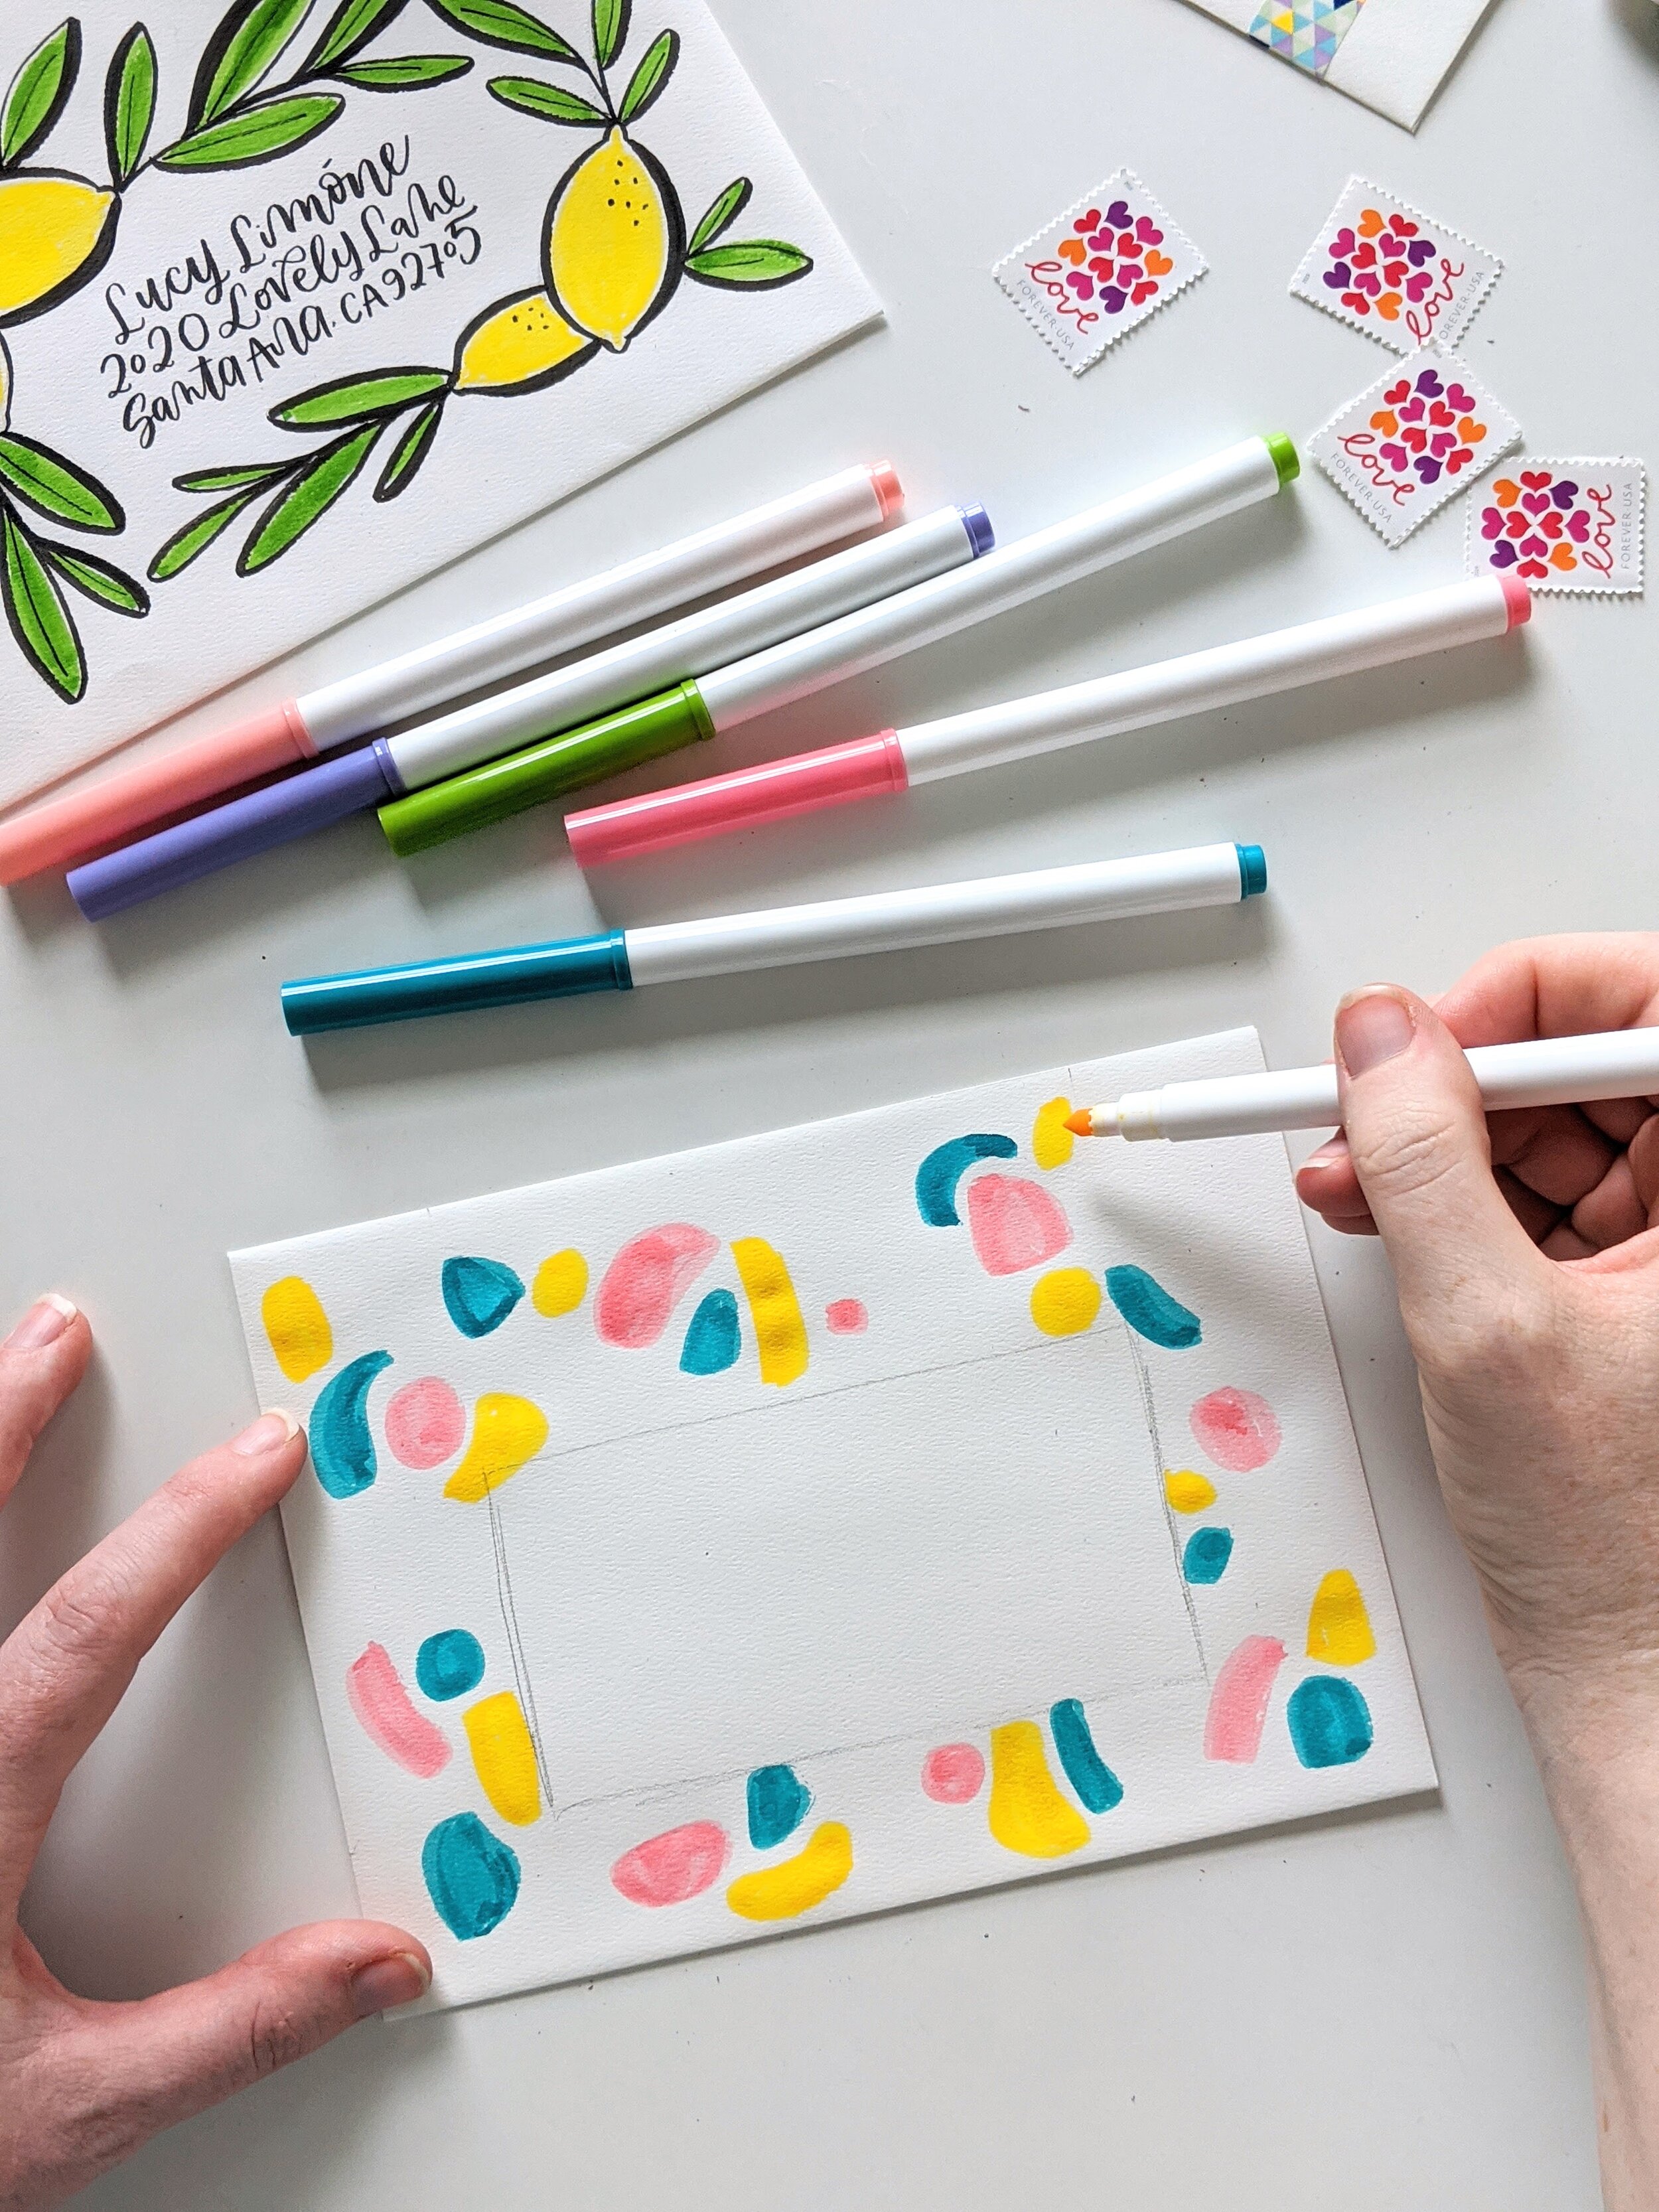

Now add purple, coral and fill in any extra spaces…
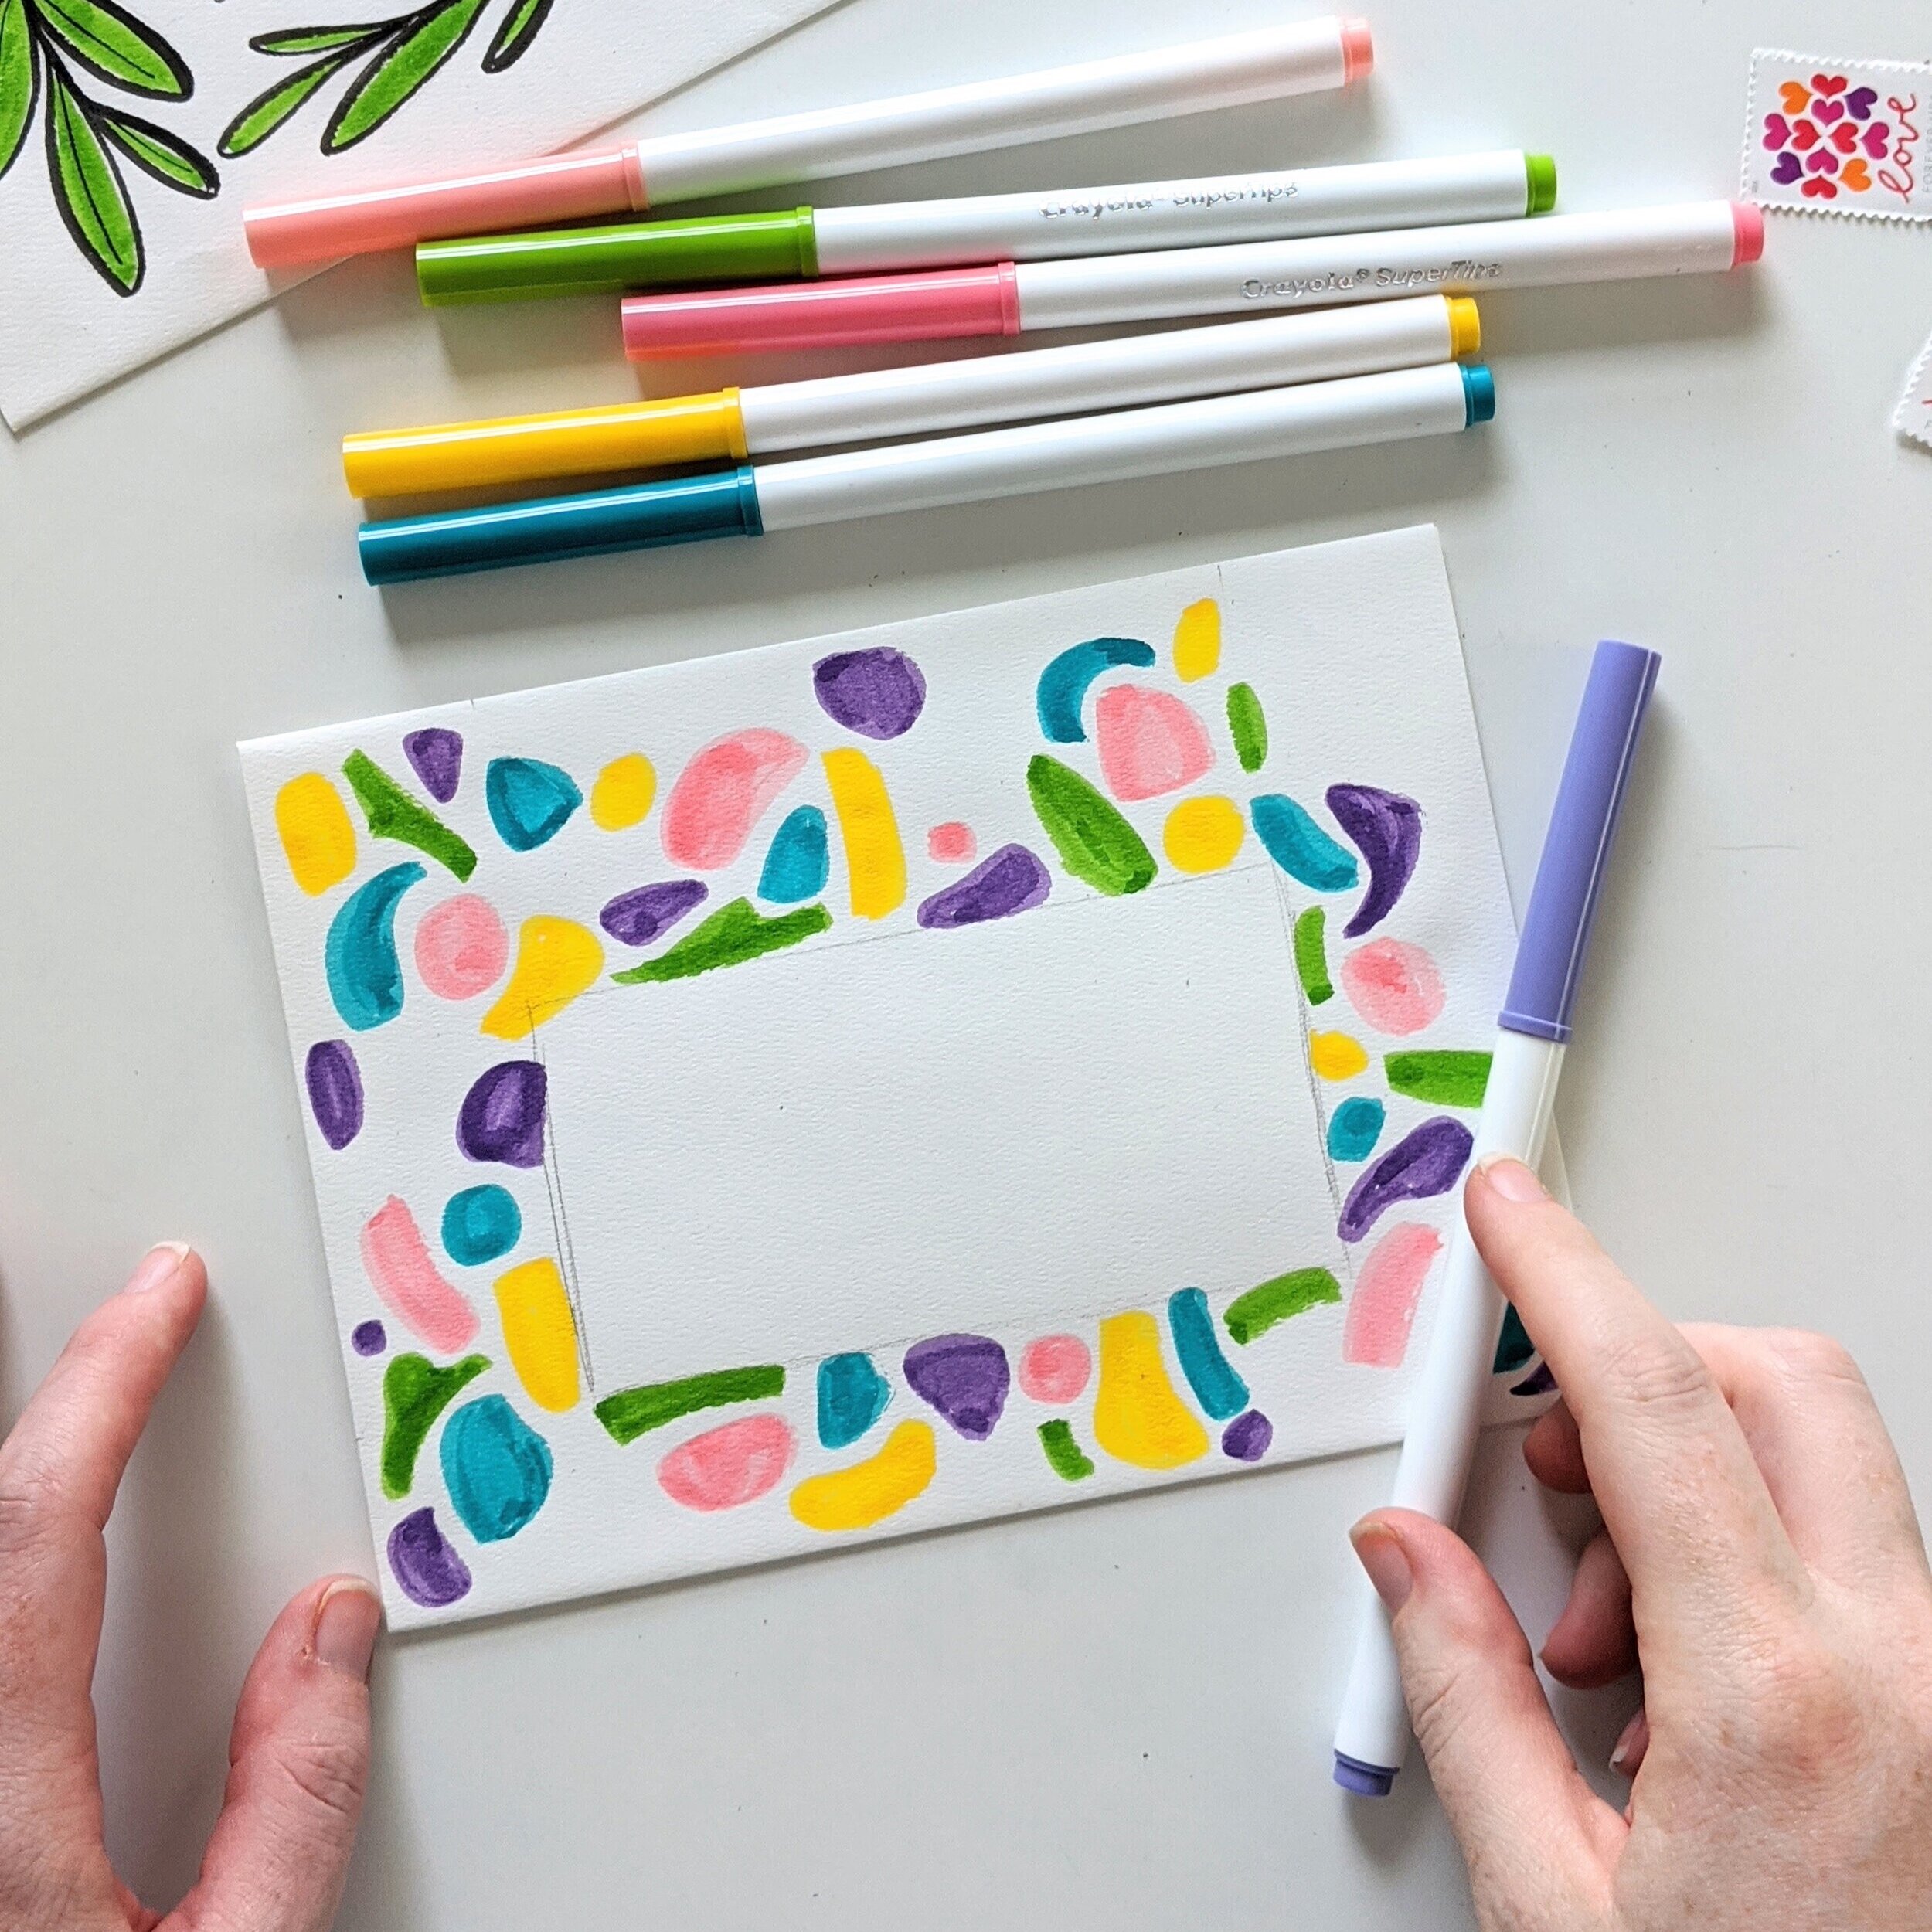


Et voila! You’ve got your very own spring terrazzo pattern! Now we could stop there. But obviously we aren’t. Once the ink is dry, grab your black pen and get to doodling! Start drawing simple floral doodles on top of your blobs. Again, simple is the name of the game here. Over the green space, add leaves. Doodle until you have a flower/leaf for every blob. Remember — flowers and leaves are organic. Not perfect. Don’t get hung up here. I promise a wonky petal here and there won’t mess up your final product.


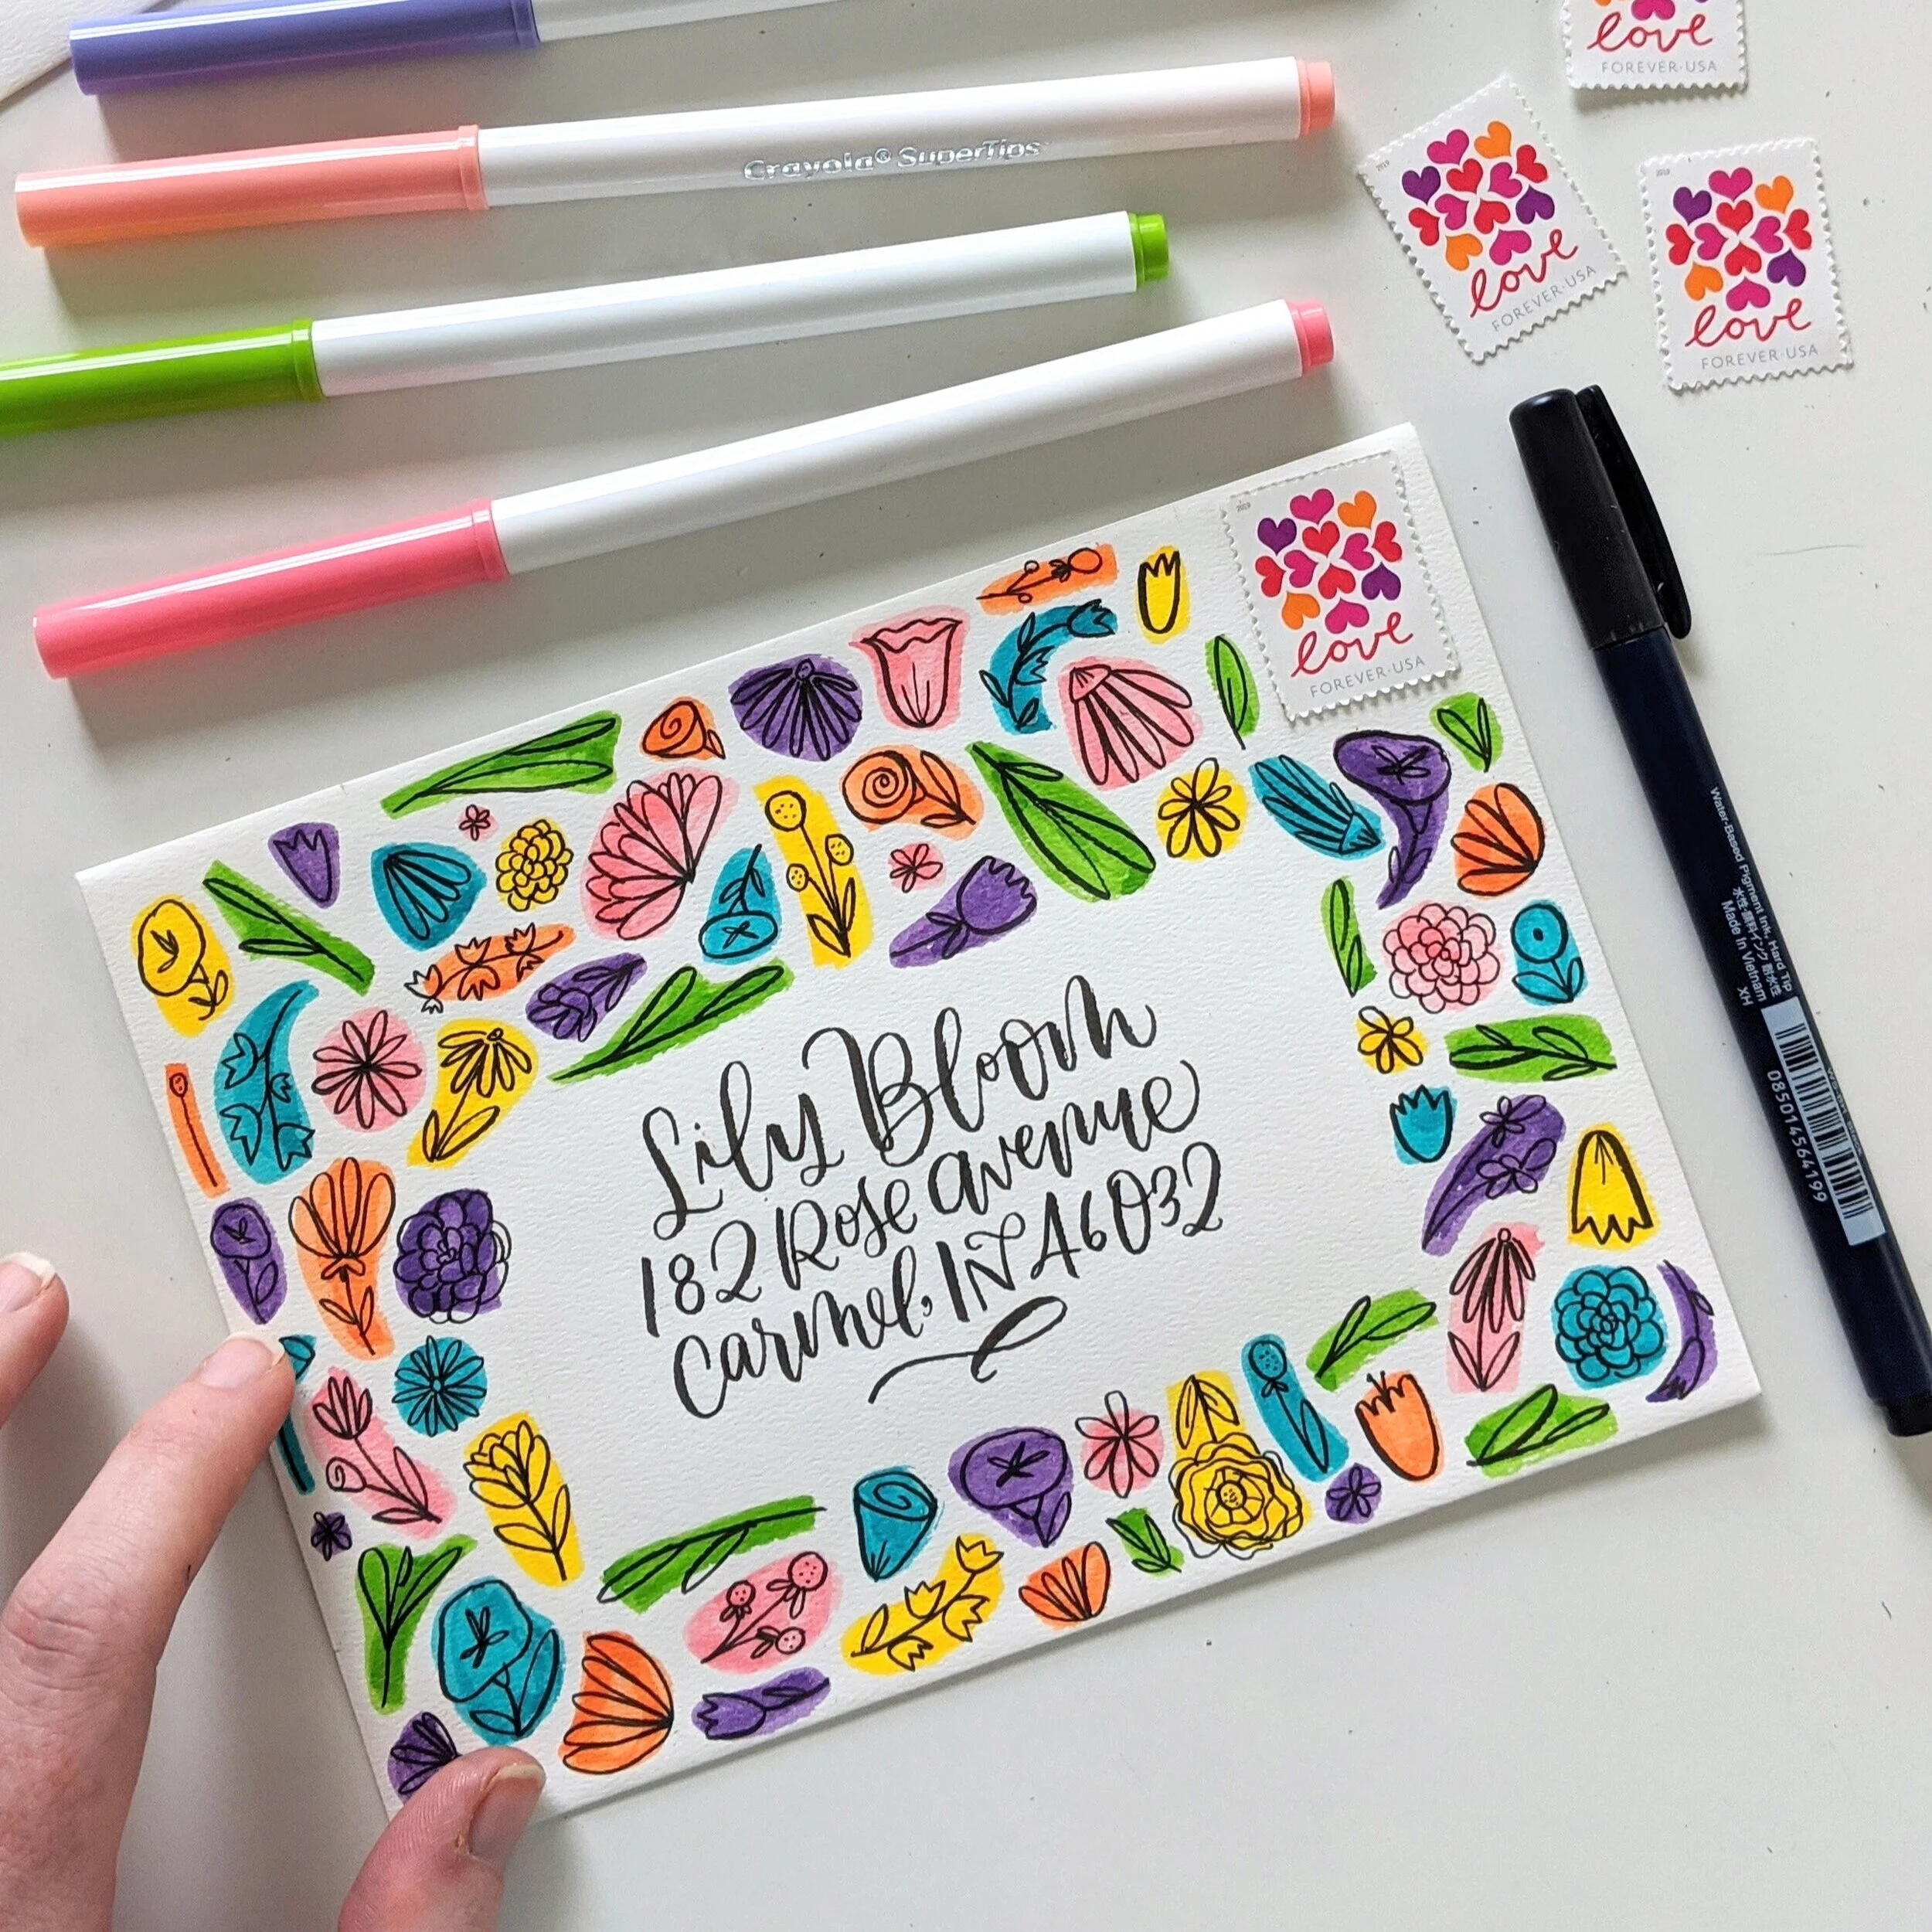
Once this is all finished, script up your address using the black pen you used for doodles.
I mean… come on. Is this not the prettiest little terrazzo floral doodle pattern you’ve ever seen? Now imagine how it will brighten the day of someone you love. It will basically be like a rainbow bursting out of their mailbox.
So what are you waiting for? Rummage through your kids’ art supplies, find envelopes and stamps in your junk drawer and let’s add a little color into this gray world. As always, I want to see your work! Please snap a pic of your enveloper, post to the ‘gram and include @hooplaletters in your caption. Just be sure you don’t share the full address — not trying to blow up someone’s spot, here.
Next week, I’m going to show you another use for these envelopes — snail mail invitations to a virtual Easter/Passover celebration! Stay tuned, and happy scripting!