The foundation began with a five-foot-wide rubble trench to support the footing. It extends below the frost line. |
 The footing is pretty substantial, to support massive stone walls. |
 Slipforms were leap-frogged up the wall for the first level of the house. |
 Window and door frames were held level with braces. |
 Rocks were free from a neighboring farm field. |
 Leap-frogging the forms up the wall exposes the stonework. |
 Insulation was sandwiched in the middle of the wall, with stonework inside and out. |
 Heavy rough-cut beams were installed to support the upper story. |
 Slipforming the "addition." |
 We decided to switch to strawbale for the upper story. |
 Look close, and you can see insulation sandwiched in the double stone wall. |
 Some of the interior walls will be exposed stone. This is the view of what will be the kitchen looking into the playroom and pantry. |
 Putting the roof on. |
 The library is built with frame construction, but will have the look of timberframe. We wanted the house to look like an old farmhouse that had been added onto over the years. |
 Finished with the roof. |
 Straw bales were added as infill in the post-and-beam upper story. |
 So, now we are officially the three little pigs, living in a house made of straw, wood, and stone. |
 It is really looking like a house! |
 We installed windows or plastic, whatever we could find, to prepare for winter. |
 All closed in and ready for plastering. |
 Details include a curved roof and rounded dormers on the "addition." |
 Inside the house, the ground floor was insulated with rigid insulation. |
 Tubing in the floor will provide radiant heat. |
 Pouring the concrete slab. |
 The concrete slab will later be dyed and grooved to simulate tiles. |
 Framing interior walls on the upper level. |
 We decided to put several layers of plaster and lime over most of the interior walls. Here is a photo of the first layer. |
 The floor was dyed and grooved to simulate tiles, which will later be grouted and sealed. |
 Finishing the pantry/mudroom. |
 Old-style doors with curtains were added to the pantry cabinetry. |
 Interior beams in the living room were whitewashed with lime to age them. |
 Plastering over the strawbales. |
 We didn't want the house to have two exterior finishes, so we decided to plaster over the stonework of the main house. |
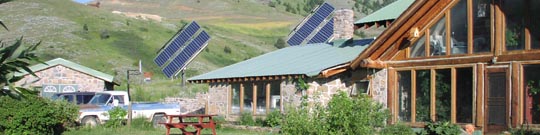
 Patches of stonework were left exposed to enhance the illusion that this was an old house reworked many times. |
 The library was finished with a timber-frame appearance.
|
 Although recently built, the house has the appearance of old farm house that has been remodeled many times. |
Amy & Jordan Lentz's
House of Stone and Straw
Two country-raised kids who fled the big city
to re-establish their rural roots.
By Jordan and Amy Lentz
with Thomas J. Elpel

This is the story of our house and farm. Jordan and I designed the house, and Jordan (with the help of family and friends) built it from the ground up. It is a "green" house, which means that, wherever possible, the materials we used were natural, local and safe for the environment.
People often ask us why we left the convenience of the city and the stability of a steady paycheck for life in the country. Believe me, there are times when this is a question we ask ourselves! In our more sane moments, though, we are reminded of the rewards of our simple life here. Enjoying fruit canned at its peak freshness and flavor, roasting a chicken raised organically in our backyard, knowing (and liking!) neighbors who would give you the shirt off their backs (and vice versa), sitting carefree in the backyard watching shooting stars after a hard day's work - these are comforts that cannot be measured in monetary value but are ultimately rich nonetheless.
March 2008: Correspondence
Hello Tom,
My name is Jordan Lentz. I talked to you a while back and I had a couple of questions for you. First, thank you for your quick responses. I had been thinking about building with straw bales, but I keep coming back to stone. My biggest concern with stone is how long will it take? In your experience, if you have all the stone, cement and forms ready to go, how long does it take to slipform? (Not including grouting.)
My other question is insulation. After a lot of research I have come to see how necessary insulation is in a stone house. How much insulation do you normally place in a double stone wall? Thank you.
Jordan
Jordan,
 The pace of the stonework depends on many factors, including the size of the rocks and whether you are doing one wall, or a double wall with insulation in the core. The double wall has twice as much stonework, and so takes twice as long. The required insulation will depend on where you live, your energy goals, and the type of insulation used. Assuming you are doing a double stone wall with beadboard insulation, six inches would be the minimum above-ground insulation for a cold climate. Supplementary heat would probably still be required. If you have been considering a choice between double-wall stonework versus strawbale, then you might consider doing both. There is an illustration in Living Homes showing a double stone wall as the foundation, with a strawbale wall starting on top
of it a few feet off the ground. Whatever you choose, I hope you will take lots of pictures.
The pace of the stonework depends on many factors, including the size of the rocks and whether you are doing one wall, or a double wall with insulation in the core. The double wall has twice as much stonework, and so takes twice as long. The required insulation will depend on where you live, your energy goals, and the type of insulation used. Assuming you are doing a double stone wall with beadboard insulation, six inches would be the minimum above-ground insulation for a cold climate. Supplementary heat would probably still be required. If you have been considering a choice between double-wall stonework versus strawbale, then you might consider doing both. There is an illustration in Living Homes showing a double stone wall as the foundation, with a strawbale wall starting on top
of it a few feet off the ground. Whatever you choose, I hope you will take lots of pictures.
Sincerely,
Thomas J. Elpel

Tom,
I would definitely be doing most of the house in a double stone wall. I am guessing that with 6" of insulation in the center, that your rock size has a lot to do with the overall size of the wall. What do you normally like to see as far has how much concrete is behind your stone? In theory, if two people were building a double stone wall, one mixing and one placing 6" to 8" stones - and everything went right - could they fill three or four 2' x 8' forms in a day? I understand that you can't give me an exact answer. I am just trying to get a rough feel for time on this project.
Thank you for your quick response.
Jordan
Jordan,
A single stone wall is usually about half rock, half concrete. In the double stone wall, each wall is probably about two-thirds rock, one-third concrete. Yes, you can fill about three 2 x 8 forms for a double wall in a day, with practice.
Sincerely,
Thomas J. Elpel

Hello Tom,
I just wanted to say thank you for all your quick responses. You have been very helpful. I cannot wait to get started on this house. I will definitely take lots of pictures and keep you posted on my progress.
I do have two questions for you. The first is how you feel about and if you have ever heard of using a rubble trench for a stone wall footer. I would still pour a hefty concrete beam on top of it. I don't see anything wrong with this method but it is hard to find much info on it. The other question is about the guy who built his house at the center of the universe; do you know where he got his foam panels so cheap? Any insight would be very helpful and greatly appreciated.
I also wanted to let you know about a new heating system that has come to the market. The company is called Dawn Solar. The premise is that you run pex tubing under your roof sheathing and the heat generated by your roof heats the liquid and can then be transferred to hot water or a heat exchanger. It is a neat system for free energy.
Thank you
Jordan
Jordan,
The rubble trench should be fine with a proper footing on it.
save money, Mark purchased the beadboard insulation without the OSB board glued to it. He bought the glue and wood separately and did the gluing himself.
It would be worth checking local factories to see if they have a scrap pile. We got about $20,000 worth of panels for free for a recent project. It would have gone to the dump otherwise. (Scrap panels are now being recycled by the company.)
Thanks for the solar tip. Keep me posted on your progress.
Sincerely,
Thomas J. Elpel
Commentary from Tom
Many owner-builder projects take many years to dream, plan, begin, learn on-the-go, close in, move into, and gradually finish as time and money allows. I didn't hear a progress report right away from Jordan after his initial emails in March of 2008, nor did I expect too. As someone who was researching his options in March, it seemed likely that he might get the project started and maybe the first level stone walls done over the course of the first year. Thus I was shocked to hear back a short six months later, "Well our house is up and we are starting to close it in this week..."
As a professional builder-contractor, Jordan had the necessary background experience to build quickly and efficiently, and to learn about new materials and techniques on the go. He used a rubble trench to get the foundation below the frost line without pouring and burying a bunch of concrete. The rubble trench is four feet deep to get below frost line in northeastern Washington. Jordan made the rubble trench five feet wide, later telling me that he likes to "overbuild everything."
Amy's Blog: September 2008
I haven't been very good at keeping you all posted (no pun intended) on the status of the house, so I'll skip the boring stuff and go straight to the major projects that have been done since I last made some updates.
With the exception of the roof, the "addition" has been completed. The "addition" (the single-story stone portion of the house) will hold the mudroom/pantry and a small play area for the kids. Upstairs, the addition will hold the master bedroom and bath. (We've done this mainly to monitor the comings and goings of any and all future teenagers we may have!)
The roof on the rest of the house has been completed, and the dormers have been added. Jordan has been busy shingling the roof, and he expects to be finished tomorrow.
If you look closely, you may notice a few installed windows. Jordan is going to build French-style windows throughout the house, but this will have to wait until the spring. As it can get pretty chilly here in the mountains, we needed something to get us through the winter. We hit the jackpot at a secondhand shop in Kettle Falls, where we were able to get over half of the windows for pennies on the dollar. The great news is that we'll be able to reuse all of the temporary windows in other outbuildings as the farm grows.
The Library: Our close friends and family (and anyone else who has ever visited us) know that we are both book fiends. Jordan, being a true Lentz, will scrape by on the barest of necessities, but we always manage to find money to buy books. This house is only one room deep, so we decided to build a nice big library on the back to store our book collection.
The library will have 18' cathedral ceilings with rough hewn beams, which is a little bigger than we could comfortably tackle if we wanted to move into the house before snow falls. So, we ordered roof trusses and had them placed by a large crane. The easy way out? Yes, but it sure saved us a lot of valuable time!
September 2008: Correspondence
Hello Tom,
This is Jordan Lentz. I had emailed with you a while back about building a stone house. Well our house is up and we are starting to close it in this week. We ended up doing 9' stone walls and then strawbale on the second story. I am still amazed at how fast the stone went up. it took about 4 weeks to do the whole house which is 56' x 24' exterior dimensions. It was a lot of fun and I would do it again in a heartbeat. the roof is on and everything is framed; we just have to stack our straw bales on the second floor and we will be closed in. Your help and advice was quite helpful through the process.
My question is about your terra tile system. I had been planning on doing more of a stamped concrete floor and prepped the house accordingly. I have 4 to 6" of tamped crushed stone with a 6 mil vapor barrier 2" of foam and about an 1" of sand. And then there is a rebar grid with radiant tubing attached. I was planning on a 4" slab. However after thinking about it and discussing it with my wife I really think I am going to try the terra tiles. I just don't want a really hard floor.
Would there be any issues of using a 3" to 4" terra tile pour, or will it not cure properly? Also have you ever used soil that has very little to no clay content? Any advice would be greatly appreciated. I will probably start the floor next week. Any other advise or tricks you have learned on the floor would also be appreciated.
Thank you very much,
Jordan
Jordan,
Thanks for sharing! Looks like your house is really coming along.
I wouldn't recommend doing thick terra tiles, but you might read up in Living Homes about doing a soil cement subfloor. You might also want to look at David Easton's book, The Rammed Earth House
Our soil has very little clay in it. That's fine. The tiles are stronger without the clay. Unfortunately, the brickforms we used to cut the tiles are no longer available and I haven't seen anything else that works as well. We did make our own brickforms with masonite cutting edges for our first project, which worked adequately.
I would advise trying a few square feet of sample tiles outside somewhere for practice. Let me know how it goes.
Sincerely,
Thomas J. Elpel
Amy's Blog: October 2008

I apologize for the delay in updating all of you on our progress, but I have been a bit busy over the past month. In addition to building the house, working part time and raising a 9-month old, I've been busy canning. Yes, it's true. I am officially a country girl now. So far, I've canned 52 quarts and 137 pints of fruit, jams, chutneys, pickles, pie filling, relishes, sauces, etc. And we still have to can tomatoes, apples, beets, pumpkin, piccalilli and beef stew. We have been given a lot of fruits and veggies (in addition to things we have harvested from my in-law's abundant garden), and we felt like we should do something with these gifts instead of letting good food go to waste. Just call me Suzie Homemaker.
While I've been busy in the kitchen, Jordan and my brother-in-law, Jonathan, have completed quite a bit of work at the house. Jonathan was able to fly out here for three weeks to work with Jordan, which was a great blessing. Together they finished shingling the roof, framed the roof on the addition, installed radiant heat, poured all of the cement floors, and installed windows, the electric framework, and plumbing. The men worked very hard and had no problems sleeping at night, that's for sure!
It would have taken too long to continue building stone walls up to the roof of the house, so we decided to build the second floor and library walls with straw bales. Don't worry - once the bales are placed and the walls prepared, we'll cover the walls (inside and out) with plaster. We'll cover the stone with plaster as well, so the outside will be uniform. I know what you're thinking - straw will attract rodents and bugs; it's a fire hazard, what about insulation, etc. Not to worry. The plaster cover keeps out any critters, and the bales are packed so tightly in the walls there is no oxygen present to fuel a fire. Wood homes are much more flammable. Lastly, straw is very dense and consequently has an insulation value of about R-42 (the standard home's insulation value is R-8 to R-22). Building with straw bales is actually not a new technology - there are homes made of straw in Europe that are several hundred years old. Since the straw is dead and covered from the elements, it won't deteriorate. So, now we are officially the three little pigs, living in a house made of straw, wood, and stone.
October 29, 2008

Jordan has really been working hard over the past few weeks. For instance, the exterior is done! Actually, it isn't quite finished, but it's as finished as it's going to get until spring. Jordan is going to build French-style doors and windows later this winter, and then install them in the spring. In the meantime, we are going to be living in a house with makeshift used doors and mismatched (not to mention some plastic) windows. Hey - whatever it takes to keep warm! The roof on the addition proved to be a challenge, but I think that it came out really well (note the cool curve on the bottom of the roof).
All of the interior walls have been framed, and we now have stairs to get to the second floor (no more rickety ladders). Jordan and his Dad will be working on the well this weekend, and the electrical work will be done next week.
Thanksgiving 2008

We are truly thankful for our many blessings this past year, especially our families. While at times the year has been quite challenging, we are tremendously in debt to our families who have helped us get through each and every hardship. We couldn't even begin to recount all they have done, let alone repay them in any meaningful manner.
Jordan is still working himself to the bone trying to get things ready for us to move into the house. It seems like things are happening very quickly now that we have walls. Our families have been such a huge support to us. My Dad has been working with Jordan almost daily, and Jordan's Dad, Jon and Kim come each weekend, despite the fact that they all work hard at their jobs during the week.
December 2008
We have decided to put several layers of plaster and lime over most of the interior walls at the house. We started with a basecoat, which is quite ugly and messy. Next week, we'll be applying a second coat of a finely textured sand and plaster. We'll have one final, tinted lime layer after that. Jordan was even able to make me a nice arch in the wall of our bathroom. I think it looks very cool - thanks honey!
Jordan continues to work like a dog. In fact, he often comes home at the end of a long day and curls up on the chairs to get some rest - just like our dogs! Poor guy - we are wearing him out!
February 2009

The house is coming along, although much slower than Jordan would like, I'm sure. Poor guy - he has to work around the constant shuffle of people coming and going, a toddler who loves to "help" her Daddy, and a wife who keeps thinking up really cool things for him to make and do.
For the past couple of weeks, Jordan has been focused on the pantry/mudroom. First, he put mortar between all of the rocks in the walls, and then he built me a great wall of cabinets. He has built doors for the cabinets, but we are waiting for the chicken wire that we will install in place of the wood panels in the doors - just to give it that down ole' country feel.
He is now starting to work on the kitchen, which is a bit more challenging logistically. He even started putting my AGA (a very cool British stove) together last night. Yahoo! More photos to follow...
Our work on the outside of the house is complete until spring. We managed to get two coats of plaster on the exterior, which leaves one coat to apply in the spring. This coat will be tinted with a lime paint, and then we'll build proper doors, shutters and paint the trim.
July 2009
Jordan has kept busy in the evenings training the puppy and installing our new windows (not necessarily at the same time!) We love European windows that can open out or into the house, but these are very expensive and hard to find in the States. So, we compromised and bought energy efficient windows that look French. It sure is nice to finally have matching windows, all of which can open! He even built me some very cool windows with arched trim for our bedroom. I love them!
January 2010

Our work on the outside of the house is complete until spring. We managed to get two coats of plaster on the exterior, which leaves one coat to apply in the spring. This coat will be tinted with a lime paint, and then we'll build proper doors, shutters and paint the trim.
May 2011
As cold as this spring has been, we've had just enough warm days to complete most of the exterior painting on our home.
Lastly, it's been awhile since I've included interior photos of the house. Here's a couple views of our pantry/mudroom.
June 2011: Correspondence
Amy,
Thanks so much for the photos! Your house looks great. Wow! What a project. Your use of the plaster over the rocks is fascinating, though unexpected. I presume it wasn't planned that way, but evolved as you went? It is really cool with the patches of stone exposed.
Sincerely,
Thomas J. Elpel
Thomas,
Thanks. I agree that the house does look great - mostly b/c of my husband's hard work. You are right - we did not initially plan on plastering over the rocks. We planned to slipform both the first and second floors, but it proved to be too time consuming to get the rocks up to the second floor. As we were on a fairly strict timeline, we opted to build a post and beam structure on the second floor and we used straw bales to fill in. I didn't want the house to have two exterior finishes (i.e. rock below and plaster over the straw bales above), so we decided to plaster the entire outside of the main house. The small addition to the left of the house was kept without plaster because (1) we love the stone look, and (2) we wanted the house to look like an old farmhouse that had been added onto over the years. Lastly, we kept small pockets of stone exposed to make it look old and b/c we love the stone look. Of course, we need to finish mortaring and add trim and shutters... We'll get there some day!
Thanks again for the compliments. Jordan worked super hard, and it's good for him to hear that he did a good job (especially from someone like you!).
All the best,
Amy
July 2011: Commentary from Tom
Shortly after this exchange of correspondence, I went on a trip out to Washington, which coincidentally brought me right by Amy and Jordan's house. They graciously gave me a tour of the house and filled in a few of the details. Measuring by the outside, the tax assessor calculates the house at about 3,500 square feet. However, as Jordan pointed out, the extra thick walls of the house take up about 800 square feet of space, so the actual living space is more like 2,700 square feet, not nearly as big as the house looks on the outside!
It was fun to tour the house and meet their children. I was astonished at the attention to detail. This wasn't a mere shell with some furniture inside. Although newly minted, the house has the feel of an old French farm home that has been remodeled and added onto many times. From the home-made woodwork and cabinetry to the furniture, light fixtures, and draperies, the house is astonishingly classy.
Although the house was more complete than most owner-builder projects at this stage, Jordan and Amy rattled off a long list of additional projects, retrofits, and finishing details to ensure keeping busy for years to come. And as a contractor, Jordan would gladly build alternative homes for any of his clients if they requested it. To hire Jordan for your project, please contact:
Heirloom Construction, LLC
509-675-1014
heirloomconstruction@gmail.com
August 2011: Correspondence
Tom,
We wanted to thank you, first, for writing Living Homes. This book was our reference of choice during the entire building process, and its instruction and tips made the project run smoothly. The book holds a wealth of useful information, and it is a must-read for anybody (laymen and professionals alike) who are interested in building a home of "unconventional" materials.
We also appreciated your availability to answer all of our questions along the way. It's rare to find an author who personally responds to readers' queries, let alone the detailed responses you sent. Our house-building experience was successful, largely due to your direct and indirect feedback. We can't thank you enough!
Amy & Jordan


 DirtCheapBuilder.com